A stronger core is less about looking a certain way and far more about feeling supported when you carry groceries, climb stairs, stand for long periods, or twist to reach something without that “uh-oh” sensation in your back.
This beginner core workout at home is designed to build stability, improve control, and teach safe core training habits, so your midsection becomes a reliable partner in daily life rather than a spot you punish with endless crunches.
What “Core” Really Means When Your Goal Is Stability

Core training is often marketed as “abs,” yet your core is a whole support system that includes deep abdominal muscles, the muscles along your spine, your diaphragm, your pelvic floor, and even your hips and glutes working together.
Stability-focused training teaches these muscles to coordinate, which matters because your spine feels best when your trunk can resist unwanted movement while still allowing smooth, controlled movement when you choose it.
Instead of chasing burn and fatigue, a beginner-friendly approach aims for steadiness, calm breathing, and clean alignment, because those are the ingredients that transfer to real life.
Core stability versus core “burn”
High-rep sit-ups can create a strong sensation, but sensation is not the same as support, especially if your neck strains or your low back arches to “help” you finish reps.
Stability work looks less dramatic, yet it trains you to keep your ribs stacked over your pelvis while you breathe and move, which is the kind of strength that protects your back when life pulls you in odd directions.
Progress in this style of training often feels like greater control, fewer aches, and more confidence in movement, which is exactly what many beginners actually want.
Signs you’re training your core in a stability-focused way
- You can breathe steadily during holds without turning red or holding your breath.
- Your neck stays relaxed, so your jaw and shoulders do not creep upward.
- Your low back stays comfortable, meaning you feel work in your trunk and hips rather than sharp spinal pressure.
- Your form looks almost “boring,” because control beats chaos for safe core training.
Safe Core Training Starts With These Non-Negotiables
Safety is the foundation of consistency, and consistency is what changes your body over time, so it helps to set a few rules before you start any beginner abs routine.
Sharp pain is a stop signal, and “pinchy” discomfort in the low back or neck is not something to push through just to finish a timer.
Technique matters more than intensity in the early weeks, because your nervous system is learning patterns, and patterns get repeated whether they are helpful or harmful.
Quick safety checklist before you begin
- Choose a firm surface like a mat or carpet, because slipping creates extra tension and awkward positions.
- Keep a small pillow or folded towel nearby, because comfort adjustments make good form easier to maintain.
- Start with shorter holds than you think you “should” do, because leaving a little in the tank builds confidence and control.
- Stop if you feel dizziness, numbness, sharp pain, or radiating symptoms, because those require a different approach and sometimes professional guidance.
Neck strain and low-back strain are the two big warnings
Neck strain usually shows up when you try to “lift your head” with your neck muscles rather than using your trunk to hold position, which is why this routine prioritizes neutral head positions over crunching.
Low-back strain often appears when your ribs flare upward and your pelvis tips forward, creating an exaggerated arch that makes your spine do the work your core is meant to share.
Better alignment is not rigid bracing, and it is a gentle stacking of ribcage over pelvis while your breathing stays smooth and your face stays relaxed.
Breathing and Bracing: The Calm Skill That Makes Everything Safer
Breathing is not a side detail, because your diaphragm and your deep core muscles work together, and learning to breathe well can instantly improve how stable you feel.
Bracing does not mean clenching as hard as possible, because over-tension can make you shake, hold your breath, and recruit the wrong muscles, especially if you are new to training.
A helpful goal is “firm but breathable,” where your midsection feels gently active while air can still move in and out without panic.
The 360-degree breathing cue
Imagine your breath expanding your ribcage in all directions, including the sides and the back, rather than only pushing your belly forward or only lifting your chest.
During the exhale, think of your ribs softening downward while your waist gently tightens like you are tightening a wide belt by one notch.
That subtle tightening is often enough for stability work, especially for beginners who are building coordination before building intensity.
Simple breathing rules for this beginner core workout at home
- Inhale to prepare, because preparation sets position without rushing.
- Exhale during the effort, because the exhale naturally encourages rib position and trunk control.
- Avoid breath-holding unless instructed by a qualified professional, because breath-holding can spike pressure and increase strain.
- Reset your posture between reps, because sloppy transitions are where many beginners lose alignment.
Warm-Up: 3 Minutes to “Turn On” Support Without Stress
A short warm-up helps your core “find” its job, and it can reduce the chance that your low back or hip flexors dominate the work.
Gentle mobility also makes the routine feel smoother, because stiff joints often force your spine to compensate.
Three-minute warm-up sequence
- Do 4 slow breaths lying on your back with knees bent, letting your ribs expand wide and your shoulders stay heavy.
- Perform 6 cat-cow reps on hands and knees, moving slowly and stopping before any pinchy sensation.
- Complete 6 hip hinges standing, sliding hands down your thighs while keeping your spine long and your knees soft.
After this short sequence, your body is usually ready to practice stability without feeling like you are forcing it.
Beginner Core Workout at Home: The Stability Routine
This routine uses simple core exercises that train anti-extension, anti-rotation, and anti-side-bending strength, which are fancy terms for “your trunk can resist being pulled out of position.”
Only six moves are included on purpose, because repeating a small menu builds skill faster than chasing novelty when you are learning safe core training.
Most beginners do well with two rounds at first, because quality tends to drop when fatigue takes over and your body starts hunting for shortcuts.
How to use the routine
- Complete the exercises in order, because the sequence builds from easiest control to slightly higher demand.
- Rest 30 to 60 seconds between moves, because calm breathing is part of the training effect.
- Stop each set while your form still looks clean, because clean reps teach your nervous system what “strong and safe” feels like.
Routine overview
- Dead Bug (core control with breathing)
- Bird Dog (spine stability with reach)
- Glute Bridge Hold or Bridge March (hips plus trunk support)
- Side Plank on Knees (side-body stability)
- Incline Forearm Plank (anti-extension with less strain)
- Bear Hover Hold (total-body bracing without crunching)
1) Dead Bug: The “Breathing + Stability” Starter
Dead bugs train your deep core to keep your ribs and pelvis stacked while your arms and legs move, which is a perfect beginner skill for daily activities like walking, carrying, and reaching.
Control matters more than speed here, because rushing usually causes rib flare and low-back arching.
How to do the dead bug safely
- Lie on your back with knees bent and feet flat, then exhale gently as if fogging a mirror to let your ribs soften down.
- Lift your legs into a tabletop position where knees are over hips, keeping your lower back heavy but not forcefully smashed into the floor.
- Raise arms toward the ceiling, letting shoulders stay relaxed rather than shrugged.
- Inhale to prepare, then exhale as you slowly lower one heel toward the floor while reaching the opposite arm overhead.
- Pause before your back arches, then return to start with control and repeat on the other side.
Reps and sets
- Do 6 to 10 reps per side.
- Complete 2 to 3 sets.
- Rest 30 to 45 seconds between sets.
Breathing cue that prevents strain
Exhale as the limb moves away, because the exhale helps you keep ribs down and reduces the urge to arch your back for range.
Common mistakes and easy fixes
- Mistake: Lower back arches as the leg extends. Fix: Reduce range and keep the heel closer to the floor only as far as you can stay stacked.
- Mistake: Neck tenses and chin juts forward. Fix: Rest the head fully and think “long neck,” not “lift.”
- Mistake: Arms slam overhead quickly. Fix: Slow down and treat the movement like controlled practice.
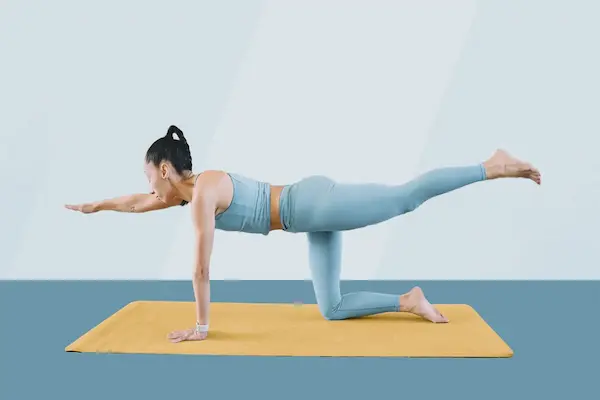
2) Bird Dog: Steady Spine, Strong Support
Bird dogs teach you to stabilize your trunk while your limbs move in opposite directions, which mirrors real-life movement like stepping, reaching, and balancing on one leg for a moment.
Position matters more than height, because lifting too high often creates back arching and makes the exercise feel “hard” in the wrong place.
How to do the bird dog with good alignment
- Start on hands and knees with hands under shoulders and knees under hips, spreading your fingers to create a stable base.
- Inhale gently, then exhale as you extend one leg back, keeping toes lightly pointed toward the floor.
- Reach the opposite arm forward only as far as you can without shifting your hips or twisting your torso.
- Hold for a breath while staying steady, then return to start slowly and switch sides.
Reps, sets, and hold time
- Perform 6 to 8 reps per side with a 2-second hold at the extended position.
- Complete 2 to 3 sets with 30 to 60 seconds of rest.
Stability cues that make it feel smoother
- Imagine balancing a glass of water on your lower back, because steadiness is the goal.
- Think “reach long” rather than “lift high,” because long lines reduce spinal compression.
- Keep ribs gently tucked, because rib flare often shows up as a subtle sagging belly.
Neck and low-back warning signs
Discomfort in the neck usually means you are craning up to look forward, so letting the gaze drop toward the floor can immediately reduce tension.
Pressure in the low back typically means range is too big, so shorten the reach and focus on staying square through the hips.
3) Glute Bridge Hold or Bridge March: Hips Support the Core
Glute bridges train your hips to share the workload with your trunk, and that partnership often reduces low-back strain during daily tasks like standing up, walking uphill, or lifting light objects.
Many beginners are surprised by how “core” this feels when done with calm ribs and a steady pelvis.
How to do a glute bridge hold
- Lie on your back with knees bent, feet flat, and heels about a hand-length from your glutes.
- Exhale gently to bring ribs down, then press through your heels to lift your hips until your body forms a straight line from shoulders to knees.
- Hold the top position while breathing slowly, keeping your ribs from popping up as you inhale.
- Lower down with control and reset your posture before repeating.
Hold time and sets
- Hold 15 to 30 seconds.
- Repeat for 2 to 4 holds.
- Rest 30 to 60 seconds between holds.
Progress option: bridge march
A bridge march adds a gentle stability challenge by lifting one foot a few centimeters without letting your hips drop or tilt, which builds control without needing heavy equipment.
- Lift into a bridge position with calm breathing and steady ribs.
- Shift weight slightly without twisting, then lift one foot just enough to unweight it.
- Place it down softly, regain steadiness, and switch sides.
- Do 6 to 10 slow marches per side.
- Complete 2 sets with plenty of rest to keep form clean.
Common strain fix
Pinching in the low back usually means you lifted too high and over-arched, so lower the hips slightly and think “ribs down, hips up,” not “push ribs to the ceiling.”
4) Side Plank on Knees: Side-Body Strength for Real Life
Side planks train the muscles that prevent you from collapsing sideways, which supports activities like carrying a bag on one side, walking with better posture, and reducing “wobbly” feelings through the hips.
The knee variation is not a lesser version, because it is an appropriate starting point that allows you to build time under tension without shoulder or back strain.
How to do a knee side plank
- Lie on your side with knees bent, stacking your hips and shoulders, then place your forearm under your shoulder.
- Exhale gently and lift your hips so your body forms a straight line from head to knees.
- Keep your top hand on your ribcage or reach it to the ceiling if that feels stable.
- Hold while breathing slowly, then lower with control and switch sides.
Hold time and sets
- Hold 10 to 25 seconds per side.
- Complete 2 to 3 sets.
- Rest 30 to 60 seconds between sides if needed.
Form cues that protect your neck and shoulder
- Press the floor away, because shoulder stability reduces neck tension.
- Keep your head aligned with your spine, because looking up or forward too aggressively can strain the neck.
- Think “hips forward,” because letting hips drift back often makes the hold feel unstable and uncomfortable.
Upgrade option when the knee version feels easy
- Straighten the top leg first while keeping the bottom knee down, because it increases challenge gradually.
- Increase hold time by 5 seconds, because controlled time is the safest way to progress early.
5) Incline Forearm Plank: A Safer Way to Learn Planks
Planks are useful, yet full floor planks can feel intense for beginners, so using an incline like a couch, sturdy chair, or countertop makes the position more manageable while still building anti-extension strength.
Better quality on an incline beats struggling on the floor, especially when your goal is safe core training rather than showing off a hard variation.
How to do an incline forearm plank
- Place forearms on a stable surface with elbows under shoulders, then step your feet back until your body forms a straight line.
- Exhale gently and draw your ribs down, feeling your midsection firm without holding your breath.
- Squeeze glutes lightly, because hips help keep the low back from sagging.
- Hold while breathing, then step forward and rest before repeating.
Hold time and sets
- Hold 10 to 30 seconds.
- Complete 2 to 4 holds.
- Rest 45 to 75 seconds to keep your breathing calm.
Low-back strain prevention cues
- Imagine pulling your front ribs toward your hip bones, because that reduces sagging.
- Keep your tailbone gently heavy, because excessive arching often feels like “dropping” into the low back.
- Shorten the hold if form slips, because endurance built with poor alignment is not the kind you want.
6) Bear Hover Hold: Full-Body Bracing Without Crunching
Bear hovers teach you to brace while supporting your body weight, and they often reveal how powerful a calm, aligned core can feel even without a single sit-up.
This move can look challenging, yet it scales beautifully when you keep holds short and focus on breath control.
How to do the bear hover safely
- Start on hands and knees with hands under shoulders and knees under hips.
- Exhale gently to set ribs down, then lift your knees one to two inches off the floor.
- Hold for a few breaths while keeping your back flat and your neck long.
- Lower knees softly, then rest fully before your next hold.
Hold time and sets
- Hold 8 to 20 seconds.
- Complete 2 to 4 holds.
- Rest 45 to 90 seconds, because good bracing requires freshness.
Beginner-friendly modifications
- Lift only one knee at a time if both knees feel too intense, because partial exposure still builds skill.
- Widen your stance slightly if balance feels shaky, because stability helps you breathe better.
- Shorten the hold to 5 seconds and repeat more times, because many small wins beat one shaky grind.
Your Beginner Abs Routine Schedule: How Often to Do This
Frequency matters because your core responds well to regular practice, yet daily hard sessions are not required for stability and can even increase strain if your form is not consistent.
Two to three sessions per week is a sweet spot for many beginners, especially when your routine includes slow holds and controlled reps rather than high-impact flexion.
Option A: Two days per week
- Complete 2 rounds of the full routine on Day 1.
- Complete 2 rounds of the full routine on Day 2, adding one extra set to your easiest move if you feel good.
Option B: Three days per week
- Perform 2 rounds on Day 1 with conservative hold times.
- Perform 2 rounds on Day 2, focusing on smoother breathing and cleaner transitions.
- Perform 2 to 3 rounds on Day 3 only if quality stays high and your low back feels comfortable.
How long the whole session should take
- Expect 12 to 20 minutes including warm-up, because controlled rest is part of the training.
- End earlier if form slips, because stopping at your best teaches your body the right pattern.
Progress Without Guessing: A Four-Week Plan That Stays Safe
Progression is important for adaptation, yet progress does not require you to chase suffering, especially when your goal is better support for daily activities rather than aesthetic outcomes.
The simplest progression tools are longer holds, slower reps, and slightly more total work, because those increase challenge without forcing risky positions.
Week 1: Learn positions and breathing
- Keep holds short, such as 10 to 15 seconds, so you can stay calm and aligned.
- Use fewer reps, such as 6 per side, so you can move slowly without rushing.
- Stop each set early, because “easy-ish” practice builds control faster than failure does.
Week 2: Add small time and smoother control
- Add 5 seconds to two of your holds, choosing the moves that feel the safest on your body.
- Add 1 to 2 reps per side for dead bugs and bird dogs, keeping your posture steady.
- Improve transitions, because many beginners lose alignment when changing sides or standing up quickly.
Week 3: Increase total work without changing difficulty too much
- Add a third round only if your form in round two looks identical to round one.
- Increase your bridge hold time slightly, because hip endurance supports trunk stability.
- Keep the incline plank incline the same, because consistency allows clearer progress tracking.
Week 4: Introduce one gentle upgrade
- Try bridge marches if you have only been doing bridge holds.
- Lower the incline slightly for planks if your alignment stays strong and breathing stays calm.
- Extend side plank holds by 5 seconds per side if your shoulder remains comfortable.
After four weeks, repeating the cycle with slightly higher quality is a perfectly valid path, because skills-based strength grows through repetition and patience.
Simple Core Exercises: How to Know You’re Doing Them “Right”
Beginners often worry about doing things perfectly, yet a better target is “safe and effective,” where your trunk feels engaged and your joints feel respected.
Good form usually looks steady, which can feel almost underwhelming at first, especially if you are used to workouts that emphasize burn and exhaustion.
Green lights that suggest good technique
- You feel work in your midsection and hips while your neck stays soft and your face stays relaxed.
- Your breathing stays possible, meaning you can inhale without your ribs flaring dramatically.
- Your movement looks controlled, with no jerking, collapsing, or rushing to beat the timer.
- Your low back feels supported rather than compressed, especially after the session is done.
Yellow lights that suggest you should scale back
- Your shoulders creep toward your ears, which often signals tension and reduced stability.
- Your low back arches more and more as the set continues, which suggests fatigue is pushing you into compensation.
- Your breath becomes choppy or held, which can spike tension and reduce control.
Red lights that mean stop and reassess
- Sharp pain in the spine, hips, or shoulders.
- Numbness, tingling, or pain that radiates down a limb.
- Dizziness that does not settle quickly with rest and calm breathing.
When red lights show up, pausing and seeking guidance from a qualified health professional is a strong, responsible choice, not a failure.
Breathing Tips That Make Core Training Feel Better Immediately
Many people unintentionally brace by clenching and holding their breath, and that strategy can make exercises feel harder while increasing pressure in places you do not want it.
A calmer approach treats breathing as your pacing tool, which helps you stay in control and avoid the panic-y “I must finish” feeling.
Breathing tips you can use on every rep
- Exhale as you move into the hardest part, because the exhale supports rib position and steady tension.
- Inhale softly through the nose if possible, because nasal breathing can encourage calm and reduce rushing.
- Keep the exhale long and quiet, because loud forceful exhales sometimes create extra neck tension.
- Reset with one full breath between reps if you feel shaky, because quality is worth the extra five seconds.
A quick “reset breath” for low-back comfort
- Lie on your back with knees bent and feet flat.
- Place one hand on your lower ribs and one hand on your lower belly.
- Inhale gently into the sides of your ribs, then exhale and feel the ribs soften downward.
- Notice the pelvis settle into a neutral, comfortable position without forcing a hard tuck.
Practicing this reset for even 30 seconds can make the next set feel noticeably safer and steadier.
Beginner Core Workout at Home: Common Questions
Should I feel soreness in my abs after this?
Mild soreness can happen, yet soreness is not required for progress, especially with stability work where coordination improves before muscle fatigue becomes obvious.
Less discomfort in the low back and better posture in daily tasks are often more meaningful signs that your core training is working.
Can I do this routine if I have a history of back pain?
Many people with mild back sensitivity do well with stability-focused moves, yet individual situations vary, so a healthcare professional is the right person to guide you if pain is persistent or unclear.
Scaling down holds, using a higher plank incline, and reducing range on dead bugs are common ways to keep things comfortable while you build capacity.
Do I need equipment?
No equipment is required for the main routine, which is why this is a true beginner core workout at home, although a mat and a small towel can improve comfort and consistency.
Resistance bands can add options later, yet bands are not necessary for building a solid foundation.
How do I know when to progress?
Progress makes sense when you can hold positions while breathing smoothly and keeping your alignment steady, because that combination signals that you own the movement rather than survive it.
Adding time in small increments is often the safest first step, because it increases challenge without changing the movement pattern dramatically.
Make Your Core Stronger for Daily Life, Not Just for a Workout
Core strength is most useful when it shows up outside the workout, so looking for real-life carryover can keep motivation high without turning training into an appearance project.
Daily activities become easier when your trunk is steady, because steady trunks make arms and legs feel more efficient and less “wobbly.”
Real-life “wins” that often improve with stability training
- Standing up from the floor feels smoother and less effortful.
- Carrying a laundry basket feels more controlled and less awkward.
- Walking longer distances feels steadier through the hips and pelvis.
- Twisting to reach a seatbelt or a shelf feels less stiff and less risky.
Small posture habits that support your training
- Practice stacking ribs over pelvis when you stand, letting your shoulders soften down rather than forcing a military posture.
- Exhale gently before lifting something light, because that can improve trunk support without over-bracing.
- Take walking breaks during long sitting periods, because movement breaks often reduce back stiffness more than stretching alone.
Better support is built by repetition across your week, not by one perfect session, which is why a short routine done consistently often beats a long routine done rarely.
Final Reminders for a Supportive, Non-Aesthetic Approach
Choosing stability over appearance is a powerful decision, because it centers your training on comfort, capability, and long-term function rather than comparison.
Patience is part of the plan, because the deepest improvements often show up quietly as you realize you trust your body more than you did a month ago.
Consistency becomes easier when you treat each session as practice rather than a test, so the routine stays friendly enough to repeat even on busy weeks.
Notice: this content is independent and does not have affiliation, sponsorship, or control over any third parties, facilities, products, or platforms that may be mentioned in general terms.