A resistance band workout for beginners can feel confusing at first, especially when you own the bands but do not yet trust where to place them or how hard to pull.
This guide turns that uncertainty into a simple, repeatable plan that keeps you safe, teaches the basics, and helps you get stronger at home without guesswork.
New routines stick when they are clear, so you will get band types explained in plain language, step-by-step setup details, and beginner band exercises for every major muscle group.
Practical pacing, safety checks, and anchoring guidance are included so your first sessions feel controlled rather than chaotic.
Resistance Band Workout for Beginners: Why Bands Work So Well at Home
Bands are popular for a reason, because they are affordable, easy to store, and surprisingly effective when you use good form and consistent effort.
Strength gains come from progressive resistance, and a home strength band creates that resistance without needing heavy weights, complicated machines, or a big room.
Compared with many gadgets, bands stay useful as you improve, since you can adjust difficulty by changing band tension, grip position, stance width, and tempo.
Confidence also grows quickly when your setup feels repeatable, which is why a simple resistance routine can become your “default” workout on busy weeks.
What a Beginner Should Expect in the First Two Weeks
Some soreness is possible, because your muscles and tendons are learning a new pattern and a new demand.
Better posture, easier daily movement, and improved energy often appear before big visible changes, which is normal and worth celebrating.
Progress tends to show up as smoother reps and calmer breathing, not as dramatic intensity spikes, so patience is a genuine training skill here.
Consistency matters more than perfection, because repeating a safe plan builds strength faster than occasionally “crushing” yourself and then disappearing.
Three Benefits That Make Bands Beginner-Friendly
- Adjustable tension: resistance changes smoothly as you stretch the band, which helps you find a manageable challenge.
- Low joint impact: controlled band work can feel gentler than heavy loads, especially when you avoid jerky pulling.
- Easy setup: a small space, a safe anchor, and basic technique are enough to train the whole body.
Band Types Explained for a Resistance Band Workout for Beginners
Choosing the right band type reduces frustration, because the wrong band can slip, pinch, or feel awkward in your hands.
Understanding what you bought also helps you select beginner band exercises that feel natural instead of forced.
Loop Bands (Mini Bands and Long Loops)
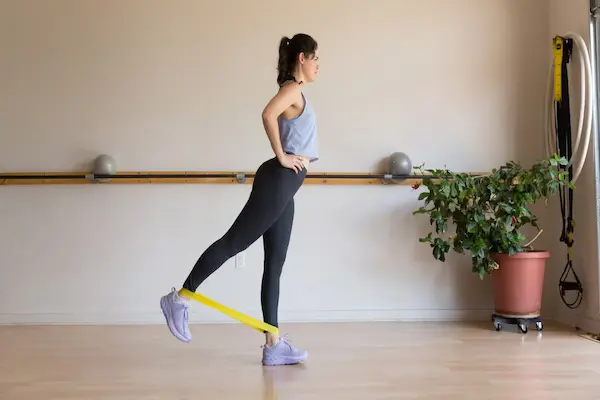
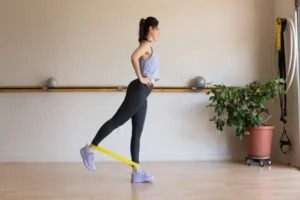
Mini loop bands are small circles often used around thighs, knees, or ankles, and they work well for glute activation and lateral steps.
Long loop bands are larger circles that can be used for rows, presses, squats, and assistance work, making them a versatile choice for a home strength band setup.
- Best for: glute work, warm-ups, rows, presses, and full-body training.
- Watch for: rolling on the legs, especially with latex bands on smooth skin.
- Beginner tip: start with lighter tension and prioritize smooth control over “max stretch.”
Tubes With Handles
Handle bands often feel intuitive because the grip is familiar, which can be comforting when you are new to pulling and pressing patterns.
Door anchors and clip attachments are common with these sets, so safety checks matter even more before you load tension.
- Best for: rows, chest presses, curls, and triceps work with a comfortable grip.
- Watch for: weak carabiners, worn clips, or frayed tube material near the handle connection.
- Beginner tip: keep your face and body out of the “snap line” in case a connection fails.
Flat Therapy Bands
Flat bands are often used for rehab-style movement and gentle resistance, which can be excellent for joint-friendly training and mobility support.
Cut-to-length options can work well if you prefer simple knots or wraps for grip, although careful handling is needed to avoid tearing.
- Best for: shoulder warm-ups, light rows, gentle presses, and mobility-focused strength.
- Watch for: thinning edges and small tears that can grow quickly under tension.
- Beginner tip: avoid overstretching to the point where the band becomes paper-thin.
Fabric Bands
Fabric mini bands can feel more comfortable on the thighs, because they tend to roll less and pinch less than thin latex options.
Training effect is still real, especially for glute and hip stability work, although fabric bands are usually less versatile for long-range pulling and pressing.
- Best for: glute bridges, lateral walks, hip stability drills, and warm-ups.
- Watch for: stretched-out fabric that loses tension over time.
- Beginner tip: treat them as a lower-body specialty tool, not your only band for full-body strength.
How to Pick Band Resistance Without Guessing
Begin with a band that allows clean reps and steady breathing, because technique and control are the fastest path to progress for new lifters.
Use this simple target: the last two reps should feel challenging while still looking smooth, with no breath-holding or jerky yanking.
- Pick a light band if you are learning movement patterns or recovering from a long inactive period.
- Choose a medium band if you can maintain posture and control through 8–12 reps without twisting.
- Save heavy bands for later, because heavy tension often pulls beginners out of good alignment.
Safety Rules for a Resistance Band Workout for Beginners
Safety is not about fear, because safety is about predictability, and predictable training is what you can repeat for months.
Most band problems come from rushed setup, poor anchoring, and worn material, so the goal is to eliminate those risks before you pull hard.
Pre-Workout Band Inspection Checklist
- Check for cracks, thinning, sticky spots, or discoloration, because those signs often indicate material breakdown.
- Look closely near handles, seams, or attachment points, because stress concentrates there.
- Stretch the band lightly first, because small tears are easier to see under gentle tension.
- Replace any band that looks compromised, because “one more workout” is not worth the risk.
Space and Body Position Rules
- Stand where the band cannot hit your face if it slips, because face-level tension is the most important area to respect.
- Keep pets and kids away from the band line, because sudden movement near tension can create accidents.
- Use a stable stance before pulling, because wobbling increases the chance of losing control or footing.
- Move smoothly rather than snapping the band, because fast yanks increase failure risk and reduce muscle control.
Anchoring Bands Safely for Home Workouts
Anchoring is where beginners should slow down the most, because a good anchor turns a simple resistance routine into a safe one.
Use anchors that are sturdy, immovable, and tested gently before full tension is applied.
Safe Anchoring Options
- Under-foot anchoring: standing on a long loop band is simple and reliable for rows, curls, hinges, and squats.
- Door anchoring with a proper door anchor: this can work well when the door closes away from you and latches securely.
- Fixed structural points: sturdy posts or heavy, immovable supports can be used when the band cannot slide or cut.
- Body anchoring: wrapping the band around your back for presses can remove the need for an external anchor.
Anchoring Steps You Should Always Follow
- Close and lock the door if using a door anchor, because accidental opening is a real risk.
- Pull gently at first while standing close, because testing reveals slippage before you commit.
- Angle your body so the band line is not aimed at your face, because a safe line of pull reduces injury risk.
- Keep tension moderate until you trust the setup, because trust is earned through safe repetition.
Anchoring Mistakes to Avoid
- Wrapping bands around sharp edges, because edges can cut and weaken elastic quickly.
- Anchoring to lightweight furniture, because shifting furniture turns tension into chaos.
- Using damaged doors or loose hinges, because hardware failure is unpredictable under pull.
- Standing too far back too soon, because extra distance multiplies tension dramatically.
Resistance Band Workout for Beginners: How to Warm Up in 4 Minutes
A warm-up helps bands feel smoother, because warmer joints move more freely and your nervous system becomes less guarded.
Four minutes is enough when you focus on rhythm and range rather than intensity.
4-Minute Band-Friendly Warm-Up
- March in place with relaxed arms for 60 seconds, because gentle cardio wakes up your breathing without fatigue.
- Shoulder rolls and arm circles for 60 seconds, because upper-body mobility supports rows and presses.
- Hip hinges without a band for 60 seconds, because hinge practice protects your back during band deadlifts.
- Bodyweight squats to a comfortable depth for 60 seconds, because leg warm-up reduces knee stiffness.
Warm-Up Cues That Make the Workout Safer
- Keep steps quiet and controlled, because rushing early usually creates sloppy reps later.
- Breathe continuously, because breath-holding is a common beginner mistake under tension.
- Stay in comfortable ranges, because forcing range during warm-up can trigger guarding.
Resistance Band Workout for Beginners: The Simple Full-Body Home Routine
This resistance band workout for beginners is designed to be straightforward, because clarity is what helps you actually use the bands you bought.
Major muscle groups are covered with pushing, pulling, squatting, hinging, and core stability, so the session feels complete without being complicated.
Two formats are included, since some people prefer “sets and reps” while others prefer timed circuits that keep decision-making minimal.
Choose the option that feels easiest to repeat, because the best simple resistance routine is the one you do consistently.
Intensity and Effort Targets for Beginners
A moderate effort works best at first, because you want to finish feeling capable rather than wrecked.
Use this guide: you should have about 2–3 reps left in the tank at the end of each set, which keeps technique clean and progress steady.
- Effort level: about 5–7 out of 10 for most work sets.
- Breathing: heavy but controlled, with the ability to speak a short phrase.
- Rest: longer rests are allowed, especially when form starts to slip.
Option A: Sets and Reps (About 25–35 Minutes)
- Do 2–3 sets of each exercise.
- Aim for 8–12 reps per set.
- Rest 45–90 seconds between sets, adding more rest if breathing feels too hard.
- Stop any set early if form breaks down, because clean reps build strength faster than messy reps.
Option B: Timed Circuit (About 18–25 Minutes)
- Work for 40 seconds per move.
- Rest for 20 seconds to reset your stance and grip.
- Complete 6 moves in a row.
- Rest 60–90 seconds between rounds.
- Repeat 2–3 rounds depending on energy.
Beginner Band Exercises for the Whole Body
Each exercise below includes setup, technique cues, and a simpler modification, because the fastest learners are the ones who adjust intelligently instead of forcing a version that feels wrong.
Anchoring notes are included inside each movement so you know exactly how to set the band before you start pulling.
Exercise 1: Band Row (Upper Back and Arms)
Rows build the upper back and support posture, which is especially helpful if you sit a lot or feel rounded shoulders during the day.
Use a door anchor or wrap a long loop around a secure point at about chest height, then step back until you feel light tension.
- Stand tall with ribs stacked over hips, because posture helps your shoulders move smoothly.
- Pull elbows back toward your sides, because elbows drive the row more than hands do.
- Squeeze shoulder blades gently, because control matters more than maximal force.
- Return slowly, because the lowering phase builds strength and reduces jerking.
- Make it easier: step closer to the anchor, because less stretch equals less resistance.
- Make it harder: step farther back or use a thicker band, because distance increases tension quickly.
- Safety note: keep your face out of the band line, because unexpected slips can happen.
Exercise 2: Band Chest Press (Chest, Shoulders, Triceps)
A press trains pushing strength without needing weights, and it pairs well with rows for balanced shoulder function.
Wrap a long band behind your upper back or anchor the band behind you at chest height, then hold handles or the band ends at your sides.
- Brace your core gently, because a stable torso keeps shoulders happier.
- Press forward until arms are extended without locking elbows, because soft elbows protect joints.
- Pause briefly in control, because that pause prevents snapping the band.
- Return slowly until hands are near your chest, because slow returns keep tension safe.
- Make it easier: use less band stretch by stepping forward.
- Make it harder: step forward into more tension or double the band carefully.
- Safety note: avoid anchoring to unstable furniture, because pressing creates strong backward pull.
Exercise 3: Band Squat (Quads and Glutes)
Squats build leg strength and stamina, which makes daily movement feel easier and reduces the “weak legs” feeling many beginners notice.
Stand on a long loop band with feet shoulder-width, hold the band at shoulder height, and keep tension light at the bottom.
- Send hips back slightly as knees bend, because this distributes load through hips and thighs.
- Keep your chest tall, because collapsing forward can stress the back.
- Drive up through midfoot, because balanced pressure improves control.
- Stand fully and squeeze glutes lightly, because finishing strong improves hip stability.
- Make it easier: reduce depth or use a chair as a target.
- Make it harder: slow the lowering for three seconds.
- Safety note: ensure the band sits flat under your feet, because twisting can cause uneven pull.
Exercise 4: Band Hip Hinge Deadlift (Glutes and Hamstrings)
Hinges train the backside of your body, which supports your back and improves “pick things up” strength in real life.
Stand on the band with feet hip-width, hold the ends, and keep arms long like straps.
- Push hips back while keeping a long spine, because the hinge happens at the hips, not by rounding your back.
- Lower hands along thighs toward shins, because that path keeps the band close and controlled.
- Pause when hamstrings feel stretched, because forcing depth is unnecessary.
- Stand up by squeezing glutes, because glutes should finish the movement.
- Make it easier: reduce range and slow the tempo.
- Make it harder: widen stance slightly to add tension or use a thicker band.
- Safety note: keep shoulders down, because shrugging can create neck tension.
Exercise 5: Band Overhead Press (Shoulders and Upper Back)
Overhead work builds shoulder strength, yet beginners should keep it controlled and avoid painful pinching sensations.
Stand on the band and hold it at shoulder height, then press upward while keeping ribs gently down.
- Set your stance and brace lightly, because a stable base keeps your spine from over-arching.
- Press up in a smooth line, because path consistency protects shoulders.
- Stop before shrugging takes over, because shrugging often signals you went too heavy.
- Lower slowly, because slow lowering reinforces control and joint comfort.
- Make it easier: press one arm at a time, because unilateral work reduces total load.
- Make it harder: increase tension by shortening your grip on the band ends.
- Safety note: avoid painful overhead range, because pain is not a training target.
Exercise 6: Pallof Press (Core Anti-Rotation)
Core work should teach stability, and the Pallof press trains your ability to resist twisting, which supports the back during daily tasks.
Anchor the band at chest height, stand sideways to the anchor, and hold the band at your chest with both hands.
- Step away until you feel moderate side pull, because tension creates the challenge.
- Press hands straight out and pause, because the pause forces your core to resist rotation.
- Bring hands back slowly, because control matters more than speed.
- Complete reps on one side, then switch, because both sides deserve equal work.
- Make it easier: stand closer to the anchor.
- Make it harder: add a longer pause or step farther away.
- Safety note: keep knees soft, because locked knees can make balance harder.
Resistance Band Workout for Beginners: A Ready-to-Run Workout Plan
Putting the exercises into a clear plan removes hesitation, because you will know exactly what to do when the timer starts.
This resistance band workout for beginners is full-body, balanced, and simple enough to repeat several times per week.
Full-Body Plan Using Sets and Reps
- Band Squat: 2–3 sets of 8–12 reps.
- Band Row: 2–3 sets of 8–12 reps.
- Band Chest Press: 2–3 sets of 8–12 reps.
- Band Hip Hinge Deadlift: 2–3 sets of 8–12 reps.
- Band Overhead Press: 2 sets of 8–10 reps.
- Pallof Press: 2 sets of 8–12 reps per side.
Full-Body Plan Using a Simple Resistance Routine Circuit
- 40 seconds Band Squat, then 20 seconds rest.
- 40 seconds Band Row, then 20 seconds rest.
- 40 seconds Band Chest Press, then 20 seconds rest.
- 40 seconds Band Hip Hinge Deadlift, then 20 seconds rest.
- 40 seconds Band Overhead Press, then 20 seconds rest.
- 40 seconds Pallof Press, then 20 seconds rest.
Two rounds are plenty to start, while three rounds can work once breathing stays controlled and technique remains clean.
Extra rest is always allowed, especially if your form starts to wobble or you feel breathless in a panicky way.
How to Pace a Home Strength Band Session Without Overdoing It
Intensity mistakes are common when you are excited, because bands can feel deceptively light until you step farther back and suddenly the tension doubles.
Smart pacing keeps the workout repeatable, which is the fastest route to long-term results.
Beginner-Friendly Pacing Rules
- Start the first set at a “practice pace,” because smooth movement teaches your body the pattern.
- Increase tension only after you own the technique, because heavier resistance does not fix sloppy alignment.
- Leave a little energy at the end, because finishing strong improves adherence next week.
- Rest longer if breathing feels too hard, because cardio panic is not required for strength progress.
How to Know Your Band Is Too Heavy
- Form breaks down within the first few reps, because the band is pulling you out of position.
- Shoulders shrug or neck tenses during presses and rows, because the body is recruiting “helper tension.”
- Breath holding happens automatically, because the load feels threatening.
- Range of motion becomes tiny and rushed, because you cannot control the tension.
Simple Fixes That Preserve the Workout
- Step closer to the anchor, because less stretch reduces resistance immediately.
- Hold the band higher or lower, because grip changes can alter tension and comfort.
- Slow the reps, because tempo increases control without needing more load.
- Switch to single-arm work, because splitting load can make pressing and rowing smoother.
Anchoring Deep-Dive: Door Anchors, Under-Foot Setups, and Safe Angles
Anchoring deserves extra detail, because confidence with anchoring is what turns band ownership into band usage.
A safe anchor should feel boring, since boring is exactly what you want when tension is involved.
Door Anchor Safety Checklist
- Position the anchor on the hinge side when possible, because hinge-side setups often reduce the chance of slipping.
- Close the door fully and test the latch, because partial closure is a hidden hazard.
- Pull lightly with your body close, because early testing reveals movement before risk increases.
- Face away from the door opening direction, because a door that opens toward you is an unnecessary risk.
Under-Foot Setup Tips That Prevent Slipping
- Place the band flat under the shoe or foot, because twists create uneven tension and surprise movement.
- Stand with weight evenly distributed, because rocking side to side can shift the band.
- Avoid sweaty floors with socks, because slipping risk rises quickly on smooth surfaces.
Angle of Pull Guidance for Joint Comfort
- Pull in a line that matches the joint, because awkward angles often irritate shoulders and elbows.
- Keep wrists neutral, because bent wrists reduce grip comfort and can create strain.
- Use shorter ranges at first, because end-range control improves with repetition.
Resistance Band Workout for Beginners: Weekly Schedule and Progression
Structure reduces stress, because you will not need to decide every day whether you are doing “enough.”
This resistance band workout for beginners works well two to four times per week, depending on your recovery and your lifestyle.
Simple Weekly Options
- 2 days per week: ideal for very busy schedules or very new exercisers who want minimal soreness.
- 3 days per week: a strong default for steady progress without feeling like training is taking over life.
- 4 days per week: useful when sessions stay short and intensity stays moderate.
Four-Week Beginner Progression Plan
- Week 1: learn setup, practice technique, and stop sets early.
- Week 2: add one extra set to two exercises, keeping the same band resistance.
- Week 3: add 1–2 reps per set where form stays clean, keeping breathing controlled.
- Week 4: increase tension slightly on one movement only, because single changes prevent overload.
Deloading is allowed whenever stress is high, because life load affects recovery just as much as workout load.
Progress should feel repeatable, because repeatability is the true goal of a simple resistance routine at home.
Troubleshooting Common Beginner Problems With Bands
Small issues can feel huge when you are new, yet most band problems have simple fixes once you know what to look for.
Use this section like a quick diagnostic tool whenever something feels off.
If the Band Rolls or Pinches
- Switch to a fabric band for lower-body work, because fabric often stays in place better.
- Place the band over clothing, because friction changes can reduce pinching on skin.
- Choose a slightly wider stance, because narrow stances can cause rolling during lateral steps.
If the Band Feels Too Easy
- Step farther from the anchor, because distance increases tension quickly.
- Slow the lowering phase, because tempo creates challenge without changing bands.
- Add a pause at peak contraction, because pausing increases time under tension safely.
- Move to a slightly thicker band, because progression eventually requires more resistance.
If the Band Feels Too Hard
- Move closer to the anchor or reduce stance width, because less stretch equals less resistance.
- Do fewer reps and add another set later, because quality volume beats forced reps.
- Use one arm at a time for presses, because unilateral work can be smoother and safer early on.
If Anchoring Feels Untrustworthy
- Prefer under-foot exercises for a while, because they remove external anchor variables.
- Test anchors with gentle pulls every session, because hardware can change over time.
- Avoid improvising with unstable objects, because stability is the foundation of safe tension.
Technique Cues That Make Beginner Band Exercises Feel Smooth
Good cues are simple, because simple cues are the ones you remember when effort rises.
Pick one cue per movement, then rotate cues across sessions as your skill improves.
Universal Cues for Almost Every Band Move
- Move like you are “pulling through thick water,” because smoothness reduces jerks and increases control.
- Exhale during the hardest part, because breath rhythm prevents tension spikes.
- Keep shoulders down and away from ears, because shrugging is a common compensation.
- Finish reps with control, because snapping back is the fastest way to feel unsafe.
Row and Pull Cues
- Lead with elbows, because elbows guide the back muscles better than hands.
- Pause briefly at the end, because that pause teaches the shoulder blades to cooperate.
- Return slowly, because the return is where many beginners lose posture.
Pressing Cues
- Keep ribs stacked, because flaring ribs often means the lower back is overworking.
- Stop before pain, because pain is not proof of effectiveness.
- Use a comfortable elbow angle, because forcing a “perfect” angle can irritate shoulders.
Resistance Band Workout for Beginners: When to Get Medical Advice
This plan is designed for general beginners using bands at home, yet bodies are individual, and health status can change over time.
Professional guidance is wise if you have injuries, health changes, or symptoms that make exercise feel uncertain.
Situations Where a Doctor Conversation Is Especially Smart
- New chest pain, fainting, or severe shortness of breath, because those signals require medical attention.
- Persistent joint swelling or sharp pain, because forcing training through warning signs often worsens problems.
- Recent injuries that still feel unstable, because stability needs assessment before loading.
- Major changes in medications or health conditions, because exercise tolerance may shift.
Frequently Asked Questions About a Resistance Band Workout for Beginners
How long should a beginner band workout take
Most people do well with 20–35 minutes, because that is long enough to train the whole body while staying easy to recover from.
Shorter sessions can still work when you are consistent, especially if you keep effort moderate and form clean.
Should I feel sore after a home strength band session
Mild soreness can happen, especially in the first two weeks, yet soreness is not required for progress and should not be chased.
Better markers include improved technique, smoother breathing, and slightly more resistance or reps over time.
Can I do resistance band workouts every day
Daily movement is fine, yet full-strength sessions every day can be too much early on, so alternating harder and easier days often works best.
Mobility, walking, and light band technique practice can fill in between strength days without overloading recovery.
What if I only bought mini bands
Mini bands are excellent for hips and glutes, although full-body training is easier with a long loop or handle band for rows and presses.
Adding a long band later can expand your simple resistance routine, yet valuable training is still possible right now using lower-body drills and core work.
Closing: Make This Resistance Band Workout for Beginners Your Reliable Starting Point
A resistance band workout for beginners becomes effective when it becomes familiar, because familiarity reduces friction and friction is what kills consistency at home.
Using safe anchoring, controlled reps, and a repeatable schedule will help you build strength steadily without needing to guess what to do next.
Notice: This content is independent and has no affiliation, sponsorship, or control by any institutions, platforms, brands, or third parties mentioned or implied.
Pick two sessions this week, start lighter than your ego wants, rest more if breathing feels too hard, and let simple repetition turn your bands into real progress.