
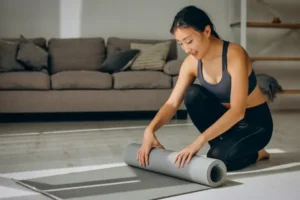
A beginner yoga inspired home workout can be calming and practical at the same time, because you get strength, mobility, and breath practice without complicated poses.
This beginner home routine keeps things non-spiritual and inclusive, so you can move with clear cues, safe options, and a steady pace that feels doable today.
General fitness information cannot replace personal medical advice, so consult a qualified health professional before starting or increasing activity, especially after injuries or health changes.
Beginner Yoga Inspired Home Workout: What You Are Really Doing
Instead of chasing flexibility by forcing long stretches, you will combine gentle flows with controlled strength so your body learns to feel safe while moving through comfortable ranges.
Many beginners enjoy a yoga style workout when it is presented like a simple sequence, because structure removes guesswork and reduces the feeling of “I don’t know what to do.”
Quiet, steady transitions will be the priority, because rushing often creates wrist strain, knee discomfort, and breathlessness that can make movement feel stressful.
Stretchy strength is the goal, meaning muscles stay active while you lengthen and control the position, rather than collapsing into end range and hoping for the best.
Who This Yoga Style Workout Fits Best
Curious beginners who want a calm home session usually do well here, because every position has a simple option that still counts as progress.
Relatively deconditioned people can still start safely, because the flow can be done mostly standing and supported by a chair when getting down to the floor feels like too much.
Anyone who enjoys mobility and posture work will benefit, because gentle flows tend to wake up hips, shoulders, and spine without needing intensity or speed.
What You Need Before You Start
- A clear space the size of a yoga mat is helpful, because fewer obstacles means fewer awkward pivots and fewer surprises for balance.
- A folded towel or small blanket matters more than it seems, because extra padding can instantly improve comfort for knees and wrists.
- A sturdy chair or couch edge is a powerful prop, because support makes the routine more accessible and reduces strain during transitions.
- A small pillow or cushion can be useful, because elevating hips or knees often turns a “nope” position into a “this feels okay” position.
- A strap substitute like a belt, scarf, or long towel can help, because gentle assistance makes stretching safer than pulling with your hands.
Safety First: Wrist, Knee, And Lower Back Friendly Choices
Safety is not about being fragile, because safety is about making each move repeatable so your beginner home routine becomes a habit instead of a one-time event.
Comfort is the main signal to watch, because sharp pain, pinching, or nerve-like sensations are not required for progress and should never be treated as a goal.
Range of motion will be earned gradually, because the nervous system often protects “stiff” areas until you prove you will not force them.
Wrist-Smart Strategies For Gentle Flows
Using wrists is optional, because many yoga-inspired movements can be done on forearms, fists, or a chair without losing the training effect.
- Try placing hands on a chair seat for plank-like positions, because less wrist extension often makes pressing and breathing feel smoother.
- Choose fists instead of flat palms on the floor, because a neutral wrist position can reduce irritation for sensitive joints.
- Use forearms for tabletop variations, because distributing pressure across the forearm can feel kinder than loading the small wrist joint.
- Take extra time to spread fingers and press through knuckles when using palms, because stable pressure reduces the “collapsed wrist” feeling.
- Stop immediately if tingling or sharp pain appears, because nerve-like sensations are a sign to modify rather than push.
Knee-Smart Strategies For Floor Work And Lunges
Knees often feel better when they are padded and supported, because pressure on a hard floor can create discomfort that has nothing to do with your strength or mobility.
- Place a folded towel under the knee during kneeling positions, because a small cushion can make a big difference in comfort.
- Use a chair for split-stance stretches instead of deep kneeling lunges, because standing options reduce knee compression while still opening the hips.
- Keep knee bends shallow on stiff days, because a smaller range can be safer and more sustainable than forcing depth.
- Align the knee with the direction of the toes, because inward collapse often feels unstable and can irritate joints over time.
- Choose a pillow under the hips for seated positions, because a little elevation can reduce knee strain and improve posture.
Lower Back Friendly Cues That Prevent Overstretching
A neutral, supported spine usually feels best, because beginners often “borrow” motion from the lower back when hips and upper back are stiff.
- Keep ribs stacked over hips during standing moves, because rib flare often turns gentle stretching into uncomfortable back compression.
- Bend knees during forward folds, because hamstring tightness can pull the pelvis and tug the lower back unnecessarily.
- Use hands on thighs or a chair for support, because support lets you hinge at the hips without collapsing into the spine.
- Exhale slowly when you feel tension rising, because long exhales often reduce bracing and make movement feel smoother.
Household Props That Make A Beginner Yoga Inspired Home Workout Easier
Props are not cheating, because props help you find alignment and comfort so you can breathe steadily and learn control without fighting the position.
Using common household items keeps this routine accessible, because you do not need special gear to get a yoga style workout that feels good.
Simple Prop Ideas And Exactly What They Help With
- A chair supports balance and reduces wrist load, because you can do standing flows, supported hinges, and gentle planks without getting on the floor.
- A towel or blanket cushions knees and wrists, because pressure points often stop beginners long before muscles do.
- A pillow elevates hips in seated positions, because elevation can reduce strain and make posture easier to maintain.
- A belt or scarf can replace a yoga strap, because gentle assistance allows stretching without yanking on joints.
- A wall provides stable feedback, because wall-supported movements can improve posture, shoulder comfort, and balance confidence.
- Two books can act like low “blocks,” because hands on elevation can reduce wrist extension and make folding positions more accessible.
Breathing Cues That Keep The Flow Calm And Non-Overwhelming
Breath is your built-in pacing tool, because breathing quality often reveals whether you are moving in a safe, sustainable range.
Longer exhales can reduce tension quickly, because exhalation is strongly linked with relaxing bracing patterns in the ribs, jaw, and shoulders.
Slow movement tends to feel easier when paired with a slow breath, because rhythm reduces the urge to rush and helps coordination feel natural.
Three Breathing Patterns You Can Use Today
- Inhale for a comfortable count and exhale slightly longer, because a longer exhale encourages calm without forcing big breaths.
- Match one inhale to one slow movement and one exhale to the return, because pairing breath with motion keeps everything controlled.
- Pause briefly after the exhale if it feels comfortable, because a tiny pause can improve stability and reduce “rushing” into the next rep.
Breathing Red Flags And What To Do Instead
- Panicky breathing suggests the pace is too high, so slow the transitions and use the chair more until breath feels controllable again.
- Breath holding often appears during effort, so deliberately exhale on the hardest moment and reduce range until you can breathe continuously.
- Dizziness can happen with fast position changes, so move slower, rise gradually, and stop if the sensation feels concerning.
Beginner Yoga Inspired Home Workout: Choose Your Time Option
Time flexibility makes the routine realistic, because busy days deserve a short win and spacious days can handle a longer, more satisfying flow.
Consistency beats intensity here, because gentle flows repeated over weeks often create more comfort than occasional long sessions done with strain.
Pick The Option That Fits Your Day
- The 10-minute option is a single pass through the flow with shorter holds, because quick practice keeps the habit alive without negotiation.
- The 12–15 minute option adds longer breathing and a second pass through the middle section, because repetition builds confidence and smoothness.
- The chair-first option keeps most work standing and supported, because access and safety matter more than being “on the mat.”
Beginner Yoga Inspired Home Workout: The Short Flow Sequence
This sequence blends simple strength and stretch, because your body learns best when mobility and stability develop together.
Transitions will stay slow and deliberate, because slow movement helps wrists, knees, and balance stay friendly.
Each step includes a chair-friendly variation, because the goal is a beginner home routine you can actually repeat without dread.
Flow Overview And Timer Guidance
Use gentle timing instead of strict counts, because your breath and comfort should lead the pace rather than a rigid script.
- Spend about 30–45 seconds on each warm-up movement, because warming tissue makes everything feel safer.
- Hold or repeat each main position for about 3–5 breaths, because breaths provide a calm structure without rushing.
- Rest at any time without guilt, because resting is a skill that keeps beginners consistent.
Step-By-Step Flow Sequence
- Standing arrival breath: stand tall with feet under hips, soften knees, inhale gently, then exhale longer while relaxing shoulders and jaw.
- Shoulder and rib reset: roll shoulders back slowly, then reach arms forward and down while keeping ribs stacked, because calm shoulders often make the whole flow smoother.
- Chair-supported half fold: place hands on a chair or thighs, hinge at hips with bent knees, and lengthen the spine without yanking, because this teaches a safe folding pattern.
- Supported half lift: keep hands on thighs, lengthen chest forward slightly, then return to the hinge, because gentle repetition builds control more safely than long holds.
- Step-back stance opener: step one foot back into a short split stance, keep both feet planted, and bend the front knee slightly while hands stay on the chair, because this opens hips without kneeling.
- Calf and ankle rock: in the split stance, shift forward and back gently with the back heel grounded, because ankle comfort supports balance and walking.
- Switch sides calmly: change legs slowly and repeat the split stance opener, because symmetry over time is more important than forcing symmetry in one session.
- Chair plank option: place hands on the chair seat, step feet back until body forms a long line, and hold for 2–4 breaths while pushing the chair away gently.
- Wall plank alternative: use a wall instead of a chair if wrists or shoulders feel sensitive, because a higher incline reduces load dramatically.
- Step forward and rise: walk feet in, roll up slowly with soft knees, and take one calming breath, because slow transitions reduce dizziness and strain.
- Chair-supported squat-to-reach: sit hips back slightly as if hovering above a chair, then stand and reach arms forward or overhead only if comfortable.
- Gentle side reach: keep feet grounded, reach one arm overhead and lean slightly, because lateral opening often reduces “stuck rib” feelings from sitting.
- Second side reach: switch arms with a long exhale, because breath-led movement tends to stay calm and controlled.
- Optional floor transition: lower to hands and knees on padding if it feels safe, because floor work can add variety but should never be forced.
- Tabletop cat-cow: inhale into a gentle arch and exhale into a gentle round, because spine movement can improve comfort when it stays within a pain-free range.
- Forearm cat-cow option: drop to forearms if wrists are cranky, because a neutral wrist can feel kinder while still mobilizing the spine.
- Thread-the-needle rotation: slide one arm under the other and rotate gently, because upper back rotation often improves breathing and posture.
- Second side rotation: switch sides slowly and keep hips steady, because controlled rotation is safer than twisting everything at once.
- Hip hinge back to “rest”: shift hips back toward heels or a chair behind you, because a gentle back shift can feel soothing for the spine and shoulders.
- Supported downward-dog-like hinge: keep hands on the chair and hinge back with a long spine, because this offers a stretch without loading wrists on the floor.
- Return to standing slowly: step forward, rise gradually, and breathe, because slow rising protects balance and keeps the nervous system calm.
- Standing balance toe taps: hold the chair lightly, tap one foot forward and back slowly, because balance improves best when practice feels safe.
- Switch the tapping leg: change sides and keep posture tall, because steady trunk positioning often makes balance easier.
- Cool-down fold and breathe: hinge gently with hands supported and take 3 long exhales, because calm endings make it easier to return tomorrow.
How To Make The Flow Feel More “Yoga” Without Adding Complexity
Soft transitions create the yoga-inspired feel, because flowing between shapes is often more important than hitting a perfect pose name.
- Move on the breath rather than on the clock, because breath-led pacing keeps the session grounded and non-competitive.
- Hold each shape for a few steady breaths, because stillness teaches control and awareness without needing intensity.
- Use smaller ranges when tired, because smaller ranges done calmly still build real mobility and strength.
Stretchy Strength: How To Get Stronger Without Turning It Into A Hard Workout
Strength in a yoga style workout often comes from time under tension, because slow holds and controlled returns challenge muscles without needing heavy loads.
Progress can be subtle and still meaningful, because steadier wrists, calmer knees, and smoother breathing are real adaptations.
Three Easy “Upgrades” That Stay Beginner-Friendly
- Add a two-second pause at the bottom of the chair-supported squat, because pauses build control and leg endurance without impact.
- Slow the lowering phase of the chair plank walk-in and walk-out, because slow transitions strengthen shoulders and core gently.
- Increase arm reach range slightly during standing reaches, because controlled overhead tolerance often improves gradually with safe repetition.
Three “Downshifts” That Protect Joints On Stiff Days
- Choose wall planks instead of chair planks, because higher incline reduces wrist and shoulder load immediately.
- Skip floor work and keep everything standing, because access and consistency beat forcing a version that creates frustration.
- Use shorter split stances in the hip opener, because shorter stances reduce knee and hip stress while still opening tissues.
Wrist And Knee Safety: Specific Fixes When Something Feels Off
Small discomfort often has a small solution, because angle, padding, and pace can change the feeling of a movement dramatically.
Listening early prevents bigger issues later, because pushing through warning signals is rarely productive in a beginner yoga inspired home workout.
If Wrists Feel Tender During Support Work
- Shift to fists or forearms for floor positions, because neutral alignment can reduce strain.
- Increase your incline by using a wall, because less bodyweight through wrists often solves discomfort quickly.
- Press through knuckles and spread fingers when using palms, because stable hand pressure reduces collapse.
- Shorten the time you hold the position, because brief quality holds beat long holds done with pain.
If Knees Feel Unhappy During Squats Or Split Stances
- Reduce depth and use the chair as a guide, because controlled partial range still builds strength safely.
- Keep steps shorter and slower, because rushing often causes awkward knee angles and heavier foot contact.
- Focus on the hip hinge more than knee bend on sensitive days, because hip-dominant movement can be kinder than deep knee flexion.
- Add more padding under kneeling points, because discomfort from pressure is different from muscular work.
Common Beginner Mistakes In Gentle Flows And Quick Fixes
Most beginners do not need more intensity, because most beginners need better pacing, better comfort, and clearer cues that reduce uncertainty.
Fixes are simple when you notice them early, because awareness is the training tool that makes a beginner home routine feel safer and more enjoyable.
Mistake: Rushing Transitions Because The Pose Feels Awkward
Slow transitions down and use a chair more often, because support creates time for your body to learn the shape without bracing.
Mistake: Chasing A Strong Stretch Sensation In The Hamstrings
Bend knees and hinge with a long spine, because hamstrings respond better to gentle, repeatable tension than to forceful pulling.
Mistake: Collapsing Into The Shoulders During Support Work
Push the floor or chair away gently and keep the neck long, because active shoulders protect joints and build stretchy strength.
Mistake: Holding Your Breath When Effort Increases
Exhale during the hardest moment and shorten the range, because breathing is a safety signal and a pacing signal at the same time.
Beginner Home Routine Scheduling: How Often To Do This Flow
Frequency matters more than length, because nervous systems and joints tend to adapt best to small, consistent doses.
A calm routine becomes easier when it is predictable, because predictable routines reduce the mental load of planning.
Beginner-Friendly Weekly Options
- Two sessions per week can be enough to start, because sustainable habits often begin with a minimum you can keep.
- Three sessions per week often feels ideal, because repetition improves coordination and comfort without overwhelming recovery.
- Daily five-minute mini-flows can work on busy weeks, because brief movement snacks reduce stiffness and protect routine identity.
A Simple Four-Week Progression That Stays Gentle
- Week one focuses on learning the flow and using props freely, because familiarity reduces tension and makes the session easier to repeat.
- Week two adds a second pass through the split-stance and chair plank sections, because repetition builds confidence without requiring new poses.
- Week three slows transitions slightly and adds brief pauses, because time under tension strengthens control without raising impact.
- Week four reduces support a tiny amount only where it feels safe, because gradual independence improves balance and joint trust.
Quick Versions For Real Life: 6 Minutes Or Less
Short sessions are not pointless, because short sessions reinforce identity and keep stiffness from building up during busy or stressful periods.
Micro routines also reduce perfectionism, because you learn that showing up counts even when the day is chaotic.
6-Minute Mini Flow You Can Do Almost Anywhere
- Stand tall and take three long exhales with relaxed shoulders, because calm breathing sets the tone quickly.
- Use a chair-supported hinge for 60 seconds with bent knees, because safe folding can reduce stiffness fast.
- Hold a short split stance for 45 seconds per side with gentle ankle rocks, because hips and calves often tighten from sitting.
- Do 60 seconds of chair-supported squat-to-reach, because legs and posture respond well to controlled repetition.
- Finish with a gentle side reach on each side and one more long exhale, because a calm ending makes the next session easier to start.
Ultra-Gentle Version For Wrist Or Knee Sensitive Days
- Keep everything standing and supported, because standing options remove pressure points without removing the training effect.
- Skip planks and choose posture squeezes instead, because shoulder and upper-back control still builds strength and comfort.
- Use a slower pace with longer rests, because recovery is a safety strategy and a consistency strategy.
Optional Add-Ons That Keep The Style Calm And Inclusive
Add-ons should feel like helpful extras rather than requirements, because pressure is the fastest way to turn a calming routine into another stressful task.
Choices let you personalize the yoga inspired feel, because your body will respond better to movements that feel good and safe.
Choose One Optional Add-On If You Have Time
- Include a seated hamstring floss using a towel strap, because gentle movement can be safer than long aggressive holds.
- Add a wall-supported chest opener with hands behind you, because posture work often helps neck and shoulder comfort.
- Try a slow heel raise set while holding the chair, because ankle strength and balance often improve together.
When To Pause And Ask A Professional
Professional guidance is wise whenever symptoms feel unusual, because clarity can protect your confidence and prevent needless setbacks.
Health changes can happen quietly over time, so checking in before you increase activity is a smart step, especially with new pain or new medications.
Situations That Deserve Extra Caution
- Sharp pain, numbness, tingling, or swelling should not be ignored, because those signs can indicate something that needs assessment.
- Chest pain, fainting, or severe shortness of breath require immediate attention, because safety always outranks finishing a flow.
- Persistent joint instability needs professional input, because stability determines how safe loading and stretching will be.
Closing: Keep It Simple, Keep It Calm, Keep It Repeatable
Calm, consistent practice is the fastest path to feeling better, because your body learns trust through repetition rather than through forcing.
Gentle flows and stretchy strength belong together, because stability makes flexibility safer and flexibility makes strength feel smoother.
Notice: This content is independent and has no affiliation, sponsorship, or control by any institutions, platforms, brands, or third parties mentioned or implied.
Choose the 10-minute version first, use the chair and towels without hesitation, and let your beginner yoga inspired home workout become a steady habit that supports real life.