
This stretching routine for lower back is a cautious, beginner-friendly way to explore gentle movement when your back feels generally stiff after sitting or standing.
Nothing here is medical advice, and any sharp, worsening, or persistent pain deserves evaluation by a qualified healthcare professional.
Stretching routine for lower back: safety-first expectations before you start
Comfort is the only goal, because a routine that feels safe is the routine you will repeat without fear or second-guessing.
Gentle back stretches should create mild pulling, warmth, or a “nice release,” while sharp pain, burning, tingling, numbness, or weakness are signs to stop immediately.
Medical causes cannot be ruled out by an article, so ongoing symptoms, severe pain, or new neurological symptoms should be discussed with a clinician rather than pushed through at home.
Slow movement is a built-in safety tool, because rushing into end ranges can trigger protective muscle guarding that makes a stiff lower back feel worse.
Breathing is your simplest intensity meter, because if you cannot breathe smoothly then the stretch is probably too deep for your body today.
Support is encouraged, because using a pillow, a chair, or a wall often reduces tension and keeps the sensation where it belongs.
Quick checklist for a safer session
- Choose a non-slip surface and a clear space, because stability reduces the urge to brace through your back.
- Wear comfortable clothing that does not restrict your hips or ribs, because restriction often turns breathing shallow and tense.
- Pick a gentle effort level before you begin, because deciding early prevents “intensity creep” when you start to feel impatient.
- Plan to stop any move that feels wrong in your body, because personal comfort matters more than completing a checklist.
- Consider professional advice if pain is sharp, persistent, or frightening, because caution is reasonable when your back is involved.
Clear “stop now” signals
- Stop if pain becomes sharp, stabbing, electric, or suddenly worse, because those sensations are not normal stretching feedback.
- Stop if numbness, tingling, or weakness appears in a leg or foot, because those symptoms require medical attention.
- Stop if you feel dizzy, faint, or unusually unwell, because safety matters more than finishing a routine.
- Stop and seek urgent care if you have loss of bowel or bladder control, severe weakness, or major trauma, because those are red flags.
Why a stiff lower back often shows up after sitting or standing
Sitting can leave your hips flexed for long periods, which may make the front of the hips feel tight and encourage extra strain through the lower back when you finally stand up.
Standing for long stretches can also create fatigue in supporting muscles, especially when weight shifts into one side and the pelvis stays relatively still.
Stress and shallow breathing can increase muscle tension, so the same posture can feel far worse on a stressful day than it does on a calm day.
Movement variety usually helps, because your back tends to feel best when it is not forced to hold a single position for hours at a time.
General stiffness is common and not automatically a sign of damage, yet persistent pain should still be evaluated because serious issues cannot be ruled out without proper assessment.
Simple posture patterns that can contribute to lower-back tightness
- Long sitting with a rounded upper back can reduce ribcage movement, which often leads to more bracing and less relaxed breathing.
- Forward-leaning standing can shift load into the lower back, especially when the glutes are not actively supporting the hips.
- Locked knees can reduce shock absorption, which may increase tension through the hamstrings and pelvis.
- One-sided weight bearing can create uneven tension, which often feels like a stiff lower back that is “worse on one side.”
How to choose intensity for gentle back stretches
A safer stretch is usually the one that feels slightly easier than you think it “should,” because calm repetition tends to beat aggressive one-off sessions.
Intensity should stay low enough that your face remains relaxed, your jaw stays unclenched, and you do not feel the urge to hold your breath.
Duration should be short enough to maintain comfort, because long holds can irritate sensitive areas when you are already stiff.
Range should be adjusted day by day, because your back may feel different depending on sleep, stress, activity, and how long you have been sitting.
The practical effort scale for a beginner
- 2–3 out of 10 feels mild and soothing, which is perfect for a stiff lower back day that needs kindness more than intensity.
- 4–5 out of 10 feels clearly stretchy while breathing stays easy, which is often the sweet spot for beginner friendly moves.
- 6 out of 10 is sometimes okay, yet it should never trigger breath-holding, wincing, or a desire to rush out of the position.
Breathing cues that keep the routine calmer
- Inhale gently through the nose if comfortable, letting the ribs expand sideways rather than lifting the shoulders toward your ears.
- Exhale slowly as if fogging a mirror, because a longer exhale can reduce bracing and signal safety to your nervous system.
- Move into a stretch on the exhale and ease out slightly on the inhale, because that rhythm helps you avoid forcing range.
- Pause and reset when breathing turns choppy, because choppy breath usually means the intensity is too high.
When to skip stretches and seek medical care instead
Back pain has many possible causes, so a cautious approach means recognizing when home stretching is not the right tool.
Professional evaluation is the safer choice when symptoms are severe, persistent, or paired with neurological signs like numbness or weakness.
Immediate help is appropriate when red flags appear, because delaying care can be risky in certain situations.
Situations where you should not “stretch through it”
- Recent falls, car accidents, or other trauma deserve medical assessment, because structural injury cannot be ruled out by feeling alone.
- Fever, unexplained weight loss, or feeling generally unwell alongside back pain should be discussed with a clinician promptly.
- New numbness, tingling, weakness, or pain radiating down the leg should be evaluated, because nerve involvement needs professional guidance.
- Night pain that wakes you consistently or pain that rapidly worsens should be assessed, because unusual patterns deserve caution.
- Persistent pain lasting weeks should be checked, because a longer timeline changes the decision-making compared with short-term stiffness.
A calm reminder before the routine
Choose medical care over self-treatment whenever symptoms feel alarming, because peace of mind and safety matter more than completing stretches.
Stretching routine for lower back: the gentle sequence for general stiffness
This stretching routine for lower back is organized to reduce guarding first, then explore hips and spine movement, and finally finish with calmer positions that feel settled.
Most people do best with five to ten minutes, because short sessions are easier to repeat and less likely to irritate a sensitive back.
A pillow or folded towel is useful, because support can make beginner friendly moves feel safer and more comfortable.
Every step is optional, because skipping a move that feels wrong is a smart decision rather than a failure.
Routine overview in order
- Breathing reset in a supported position.
- Pelvic tilts to gently explore motion.
- Knee-to-chest, one side at a time.
- Figure-four hip stretch for glutes.
- Cat–cow for gentle spinal movement.
- Child’s pose variation or supported rest.
- Hip flexor stretch with support.
- Hamstring stretch with a soft knee.
- Gentle trunk rotation if it feels good.
- Easy standing reset and posture check.
Step 1: Supported breathing reset
Lie on your back with your lower legs on a chair or couch so your hips and knees are bent about ninety degrees, because this position often reduces pressure and helps a stiff lower back relax.
Rest one hand on your belly and one hand on your ribs, then let your shoulders soften into the floor while your jaw unclenches.
Inhale quietly and feel the belly rise, then exhale longer than you inhale, because the long exhale can reduce protective tension.
Stay for five slow breaths, and stop immediately if the position increases pain rather than easing it.
- Hold tip: aim for five breaths rather than a strict timer, because breath-counting keeps the pace calm and flexible.
- Comfort tip: place a small pillow under your head if your neck feels strained, because neck tension can increase back tension.
- Safety tip: seek medical care if lying down triggers sharp pain or nerve-like symptoms, because that pattern deserves evaluation.
Step 2: Pelvic tilts for gentle motion
From the same position, gently tilt your pelvis so your lower back moves slightly toward the floor, then let it return to neutral without forcing an arch.
Slowly repeat the tilt ten times, because repetition builds comfort and teaches the nervous system that motion is safe.
Keep the movement small, because bigger range is not necessary and may feel irritating when the back is sensitive.
- Exhale as the lower back gently settles, because exhaling often reduces bracing.
- Inhale as you return to neutral, because returning slowly prevents a sudden, jerky change.
- Stop if pain spikes, because pelvic tilts should feel mild and controlled.
Step 3: Knee-to-chest, one side at a time
Bring your right knee toward your chest with both hands behind the thigh or over the shin, choosing the grip that feels safest for your knee.
Hold lightly and breathe slowly for three to five breaths, because a gentle hold can ease a stiff lower back without forcing spinal flexion.
Switch sides and repeat, keeping the opposite leg bent if straightening it increases discomfort.
- Intensity cue: keep the pull light enough that your shoulders stay relaxed and your neck stays long.
- Modify: place the left foot on the chair if lifting it feels like too much effort.
- Medical reminder: stop and seek advice if this causes shooting pain down the leg, because radiating symptoms require evaluation.
Step 4: Figure-four stretch for hips and glutes
Cross your right ankle over your left thigh, then gently draw the left thigh toward you until you feel a mild stretch in the outer right hip.
Hold for three to five breaths while keeping the right foot lightly flexed, because foot flexion often protects the knee position.
Switch sides and repeat, staying patient if one side feels tighter, because asymmetry is common and not something to “force equal.”
- Set the shape gently, because forcing the knee open can irritate joints.
- Use the breath to soften, because relaxed exhaling often reduces hip guarding.
- Stop if knee pain appears, because the goal is a hip stretch, not joint strain.
Step 5: Cat–cow for beginner friendly movement
Move to hands-and-knees, or place hands on a countertop if wrists or knees are sensitive, because support helps you keep the motion gentle.
Inhale and let the belly drop slightly while the chest opens, then exhale and round gently as the shoulder blades spread.
Continue for six slow cycles, because rhythmic motion can reduce stiffness without long holds.
- Range cue: keep it small enough that you never feel a pinch in the lower back.
- Breath cue: let the exhale guide the rounding, because exhaling can reduce bracing.
- Safety reminder: skip this move if kneeling increases pain, because alternatives exist and pain is not a requirement.
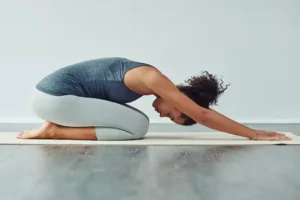
Step 6: Child’s pose variation or supported rest
From hands-and-knees, slowly sit your hips back toward your heels while reaching your hands forward, stopping early if the fold feels uncomfortable.
Support the torso with a pillow or folded towel if needed, because support often turns a difficult position into a calm rest.
Breathe for three to five breaths, keeping the sensation gentle and backing out immediately if pain increases.
- Widen the knees if the hips feel pinchy, because extra space can reduce compression.
- Keep the arms relaxed if shoulders feel tight, because shoulder strain can add tension to the back.
- Seek medical care if deep flexion positions consistently worsen symptoms, because pattern-based pain deserves evaluation.
Step 7: Supported hip flexor stretch to reduce front-hip tension
Stand in a short split stance beside a wall or chair, because balance support reduces wobbling and helps the back stay relaxed.
Gently tuck the pelvis as if zipping up snug jeans, then shift forward slightly until you feel a mild stretch at the front of the back hip.
Hold for three slow breaths, then switch sides, keeping the stance short rather than deep to avoid instability.
- Back-protection cue: avoid a big lower-back arch, because arching can increase pressure rather than reduce stiffness.
- Intensity cue: think “small shift, steady breath,” because forcing depth often backfires.
- Stop rule: stop if the move causes sharp back pain, because that response means the variation is not right for you today.
Step 8: Hamstring stretch with a soft knee
Place one heel on a low step or sturdy surface, keep the knee slightly bent, and hinge forward from the hips until you feel a mild stretch behind the thigh.
Hold for three breaths while keeping the spine long, because rounding hard can shift the sensation into the lower back.
Switch sides and repeat, staying conservative if hamstrings feel “grabby” or sensitive.
- Set posture first, because good alignment reduces unnecessary strain.
- Hinge slowly, because speed encourages bracing.
- Back off if pulling appears behind the knee, because that often signals too much intensity.
Step 9: Gentle trunk rotation, only if it feels easy
Lie on your back with knees bent and feet on the floor, then let both knees drift slightly to one side while shoulders stay heavy.
Hold for two to three breaths, then return through center and repeat to the other side, keeping the range small and the breath steady.
Skip this entirely if twisting increases pain, because a stretching routine for lower back should never feel like a gamble.
- Comfort cue: keep the rotation mild enough that you could stay longer without tension building.
- Modify: place a pillow between knees if the hips feel strained.
- Medical reminder: radiating symptoms during rotation should be evaluated by a clinician.
Step 10: Easy standing reset to finish
Stand slowly, place one hand on a wall for support, and take one long exhale as you let the shoulders drop and the ribcage settle.
Shift weight gently from foot to foot for ten seconds, because small movement helps you transition without a sudden load change.
Finish with a short walk around the room if it feels good, because light movement often helps reduce stiffness after stretching.
Stretching routine for lower back: hold-duration tips that stay gentle
Short holds are usually safer for a stiff lower back, because long holds can increase irritation when tissues are sensitive.
Breath-based holds often feel better than strict timing, because your nervous system tends to relax when you focus on slow breathing rather than counting seconds.
Two short rounds can beat one long round, because the second pass often feels smoother without needing more intensity.
Simple hold options you can pick today
- Breath method: hold each stretch for three to five slow breaths while keeping effort around 3–5 out of 10.
- Timer method: hold each stretch for 20–30 seconds, then exit slowly and rest for one breath.
- Mini method: hold for just two breaths per stretch when symptoms are mild but time is short.
Signs a hold is too long or too intense
- Breath becomes shallow or held, because breath-holding is often a sign that the body feels threatened.
- Muscles start shaking or cramping, because those signals often mean the position is too demanding.
- Pain increases during the hold rather than easing, because helpful stretching usually feels steady or gradually calmer.
- Symptoms linger and feel worse afterward, because worsening after stretching is a cue to scale back and consider medical advice.
Options to shorten or extend this lower-back sequence
Short versions keep the habit alive on busy days, while longer versions can feel more thorough when your schedule allows it.
Changing duration should not mean forcing intensity, because longer sessions should feel calmer, not more aggressive.
5-minute version for a busy day
- Supported breathing reset for five breaths.
- Pelvic tilts for ten gentle reps.
- Knee-to-chest for three breaths per side.
- Hip flexor stretch for three breaths per side.
- Easy standing reset with one long exhale.
10-minute standard version for most beginners
- Complete steps 1 through 10 once, holding most positions for three to five breaths.
- Repeat the single tightest stretch for one extra breath per side if it feels calming.
- Finish with a slow walk and posture check, because movement often helps the new range “stick.”
15-minute extended version for calmer days
- Complete the full routine, then repeat pelvic tilts, figure-four, and hip flexor stretches for one extra round.
- Add one extra minute of supported breathing at the end, because downshifting can reduce protective tension.
- Keep all intensity moderate, because extended time should never become an excuse to push deeper.
Frequency ideas for a stiff lower back that returns during the day
Frequent gentle movement often helps more than occasional intense stretching, because the back usually prefers variety and regular resets.
Many adults feel better with short sessions one to three times daily, especially after long sitting blocks.
Persistent or worsening pain still deserves medical attention, because repeating stretches should not replace evaluation when symptoms are ongoing.
Practical schedules you can try
- After-sitting plan: do the 5-minute version once after your longest sitting block, because that timing matches the stiffness trigger.
- Twice-daily plan: do the standard routine after work and again before bed, because evening sessions often feel calmer and more controlled.
- Micro-break plan: do pelvic tilts, cat–cow, and a short walk every 60–90 minutes, because small movement breaks can reduce stiffness buildup.
How often is “too often” for beginners
- Too much is likely if soreness increases daily, because helpful stretching usually leaves you the same or better, not progressively worse.
- Too much is likely if you start guarding movement, because fear-based bracing can increase back tension.
- Too much is likely if you need to push harder for the same sensation, because chasing intensity can irritate sensitive tissues.
Common mistakes with gentle back stretches, and safer alternatives
Pushing into pain is the most common mistake, because pain can trigger guarding and make the stiff lower back feel more reactive later.
Moving too fast is another common mistake, because speed reduces control and can surprise the nervous system.
Skipping the breathing reset is also common, because the body often needs a downshift before it will release tension.
Mistakes to avoid in a stretching routine for lower back
- Bouncing in stretches can increase irritation, so choose steady holds or small controlled pulses instead.
- Locking the knees in hamstring stretches can pull on the pelvis, so keep a soft bend and hinge gently.
- Overarching during hip flexor work can compress the back, so keep ribs stacked and pelvis gently tucked.
- Forcing twists can feel risky, so keep rotation tiny or skip it when it does not feel immediately comfortable.
Safer alternatives when a move feels wrong
- Replace twisting with supported breathing, because calm downshifting often reduces tension without provoking symptoms.
- Replace kneeling positions with countertop cat–cow, because standing support can feel safer for sensitive knees and backs.
- Replace hamstring stretches with a short walk, because movement can reduce stiffness without any end-range stretching.
- Replace figure-four with a gentle glute squeeze and release, because light activation can sometimes feel better than stretching on tender days.
FAQ for a stretching routine for lower back
Can this routine cure lower-back pain?
This routine cannot diagnose, treat, or cure medical conditions, so think of it as a gentle experiment that may ease general stiffness while you monitor how your body responds.
Should stretches be done when the back feels “cold” and tight?
Starting with breathing and small motion is often safer than jumping into deep holds, because warm tissues and calm breathing usually make gentle back stretches feel better.
Is it normal to feel tighter on one side?
Asymmetry is common, yet sharp one-sided pain or symptoms traveling down a leg should be evaluated by a clinician rather than handled only with stretching.
What if a stretch feels good during it but worse later?
Scaling back range, shortening holds, and seeking professional guidance is the cautious move, because delayed worsening can be a sign the intensity was too much.
When should medical care be the priority?
Medical care should be the priority when pain is sharp, persistent, worsening, associated with neurological symptoms, or simply feels concerning to you.
Notice about independence and third parties
Notice: this content is independent and does not have affiliation, sponsorship, or control by any institutions, platforms, or third parties mentioned or implied.
Printable recap: beginner friendly moves for a stiff lower back
- Supported breathing with legs elevated on a chair to reduce bracing.
- Pelvic tilts for gentle control and low-risk motion.
- One-knee-to-chest holds to explore comfort without forcing.
- Figure-four hip stretch to address glutes that can contribute to perceived tightness.
- Cat–cow for smooth spine movement with breath-led pacing.
- Child’s pose variation or supported rest when flexion feels soothing.
- Supported hip flexor stretch to reduce front-hip tension from sitting.
- Soft-knee hamstring hinge to avoid pulling on the back.
- Very gentle rotation only if it feels immediately comfortable.
- Slow standing reset and a short walk to finish.
Closing guidance for cautious progress
Consistency with low intensity is usually the safest approach, because small sessions repeated often can reduce stiffness without provoking a sensitive back.
Listening to your body is not vague advice here, because stopping when something feels wrong is a practical skill that protects you.
Seeking medical care is the right next step when pain is persistent, sharp, or worrying, because your long-term health matters more than any routine.
Keeping this stretching routine for lower back gentle, optional, and repeatable gives you the best chance of feeling looser without taking unnecessary risks.