Feeling your shoulders creep up toward your ears is common, especially on busy days, and this stretching routine for stiff shoulders is designed to help you downshift gently.
Instead of forcing range, you will use slow, controlled positions that encourage the neck and upper back to soften without sudden, jerky movement.
If your tightness shows up after screen time, stress, or long meetings, this stretching routine for stiff shoulders can act like a practical reset that fits real life.
Persistent, sharp, or worsening pain should be assessed by a qualified healthcare professional, because an article cannot diagnose the cause of symptoms.
Stretching routine for stiff shoulders: what this is and who it fits
This stretching routine for stiff shoulders is a simple sequence of beginner friendly moves that target the shoulder area, the upper back, and the muscles that often brace when you feel rushed or tense.
Practical pacing is the priority, so every step is written to be easy to follow even when you are tired, distracted, or short on time.
A chair, a wall, and a small clear patch of floor are enough, which makes the routine workable at home and also realistic for many office settings.
Comfortable range is the rule, meaning you should feel a mild pull or warm release rather than sharp pain, tingling, numbness, or any sensation that feels alarming.
People with desk worker shoulders often do best when they focus on posture cues and breathing first, because the shoulders usually tighten as part of a whole-body stress response rather than as an isolated “shoulder problem.”
Anyone who notices that one side feels very different can still use the routine, yet extra caution is smart when asymmetry comes with radiating symptoms or sudden weakness.
What you will get from this shoulder mobility routine
- You will learn a shoulder mobility routine that uses slow transitions, because quick changes can trigger bracing and make tightness feel worse.
- You will practice upper body stretches that respect arm height and shoulder position, because better alignment often creates more relief than pushing deeper.
- You will get a repeat plan for desk worker shoulders, because frequent small resets often help more than occasional long sessions.
- You will see clear safety notes, because the most helpful routine is the one that feels trustworthy and repeatable.
What you will not do here
- No bouncing, because bouncing can provoke guarding and may irritate sensitive joints.
- No forcing the arm overhead if it pinches, because shoulder structures vary and comfort matters more than “full range.”
- No aggressive neck pulling, because the neck can become reactive when the shoulders are already tense.
Why shoulders creep up toward ears when stressed or working
Stress often changes breathing, and shallow breathing can recruit neck and upper chest muscles that were never meant to carry the workload all day long.
Screen time can pull the head forward, and a forward head position frequently invites the shoulders to elevate and round as the body tries to stabilize.
Desk worker shoulders are also influenced by how often you reach for a mouse, how high your keyboard sits, and whether your elbows hover without support, because small postural demands add up over hours.
Muscle tightness can be a protective response, meaning the body sometimes “locks down” when it feels uncertain or overloaded, even if there is no single dramatic injury.
Upper-back stiffness plays a role too, because limited movement through the ribcage can make the shoulder blades glide less smoothly, which then encourages shrugging and neck tension.
Work intensity can amplify all of this, since the mind-body connection is real enough that deadlines often show up in the shoulders before you consciously notice the stress.
Common patterns behind stiff shoulders
- Forward head posture increases the load on neck muscles, which often makes the shoulders lift as compensation.
- Rounded upper back reduces rib movement, which can limit how freely the shoulder blades move.
- Jaw clenching recruits neck tension, which can feed the feeling of a tight shoulder “cap.”
- Unsupported elbows during typing encourage upper traps to work overtime, which can create a constant shrug.
Very cautious safety notes for shoulder and upper-back stretching
This content is educational and non-medical, so it cannot diagnose, treat, or replace individualized care from a qualified professional.
Sharp, worsening, or persistent pain should be evaluated by a healthcare professional, especially if symptoms limit daily function or disturb sleep.
Tingling, numbness, weakness, or pain that travels down the arm deserves prompt medical attention, because nerve involvement cannot be assessed safely through general instructions.
Sudden loss of strength, severe trauma, or any symptom that feels alarming is a reason to seek urgent care rather than continuing a home routine.
Notice: this content is independent and does not have affiliation, sponsorship, or control by any institutions, platforms, employers, or third parties mentioned or implied.
Personal responsibility matters, so choose the gentlest option that feels safe in your body, and skip any move that feels wrong.
Clear “stop now” signals during a stretching routine for stiff shoulders
- Stop if pain feels sharp, stabbing, electric, or suddenly intense, because those sensations are not normal stretching feedback.
- Stop if tingling, numbness, or radiating symptoms appear, because those signs deserve medical evaluation.
- Stop if the shoulder feels unstable, like it might slip or catch, because stability is more important than completing a stretch.
- Stop if dizziness occurs during neck-related positions, because safety comes first and alternatives exist.
Gentle principles that reduce risk
- Move slowly enough that you could stop at any moment, because control is a practical sign of a safe range.
- Keep breathing smooth, because breath-holding often means the nervous system feels threatened.
- Use support when needed, because stability allows muscles to relax instead of brace.
- Choose smaller arm angles when pinching appears, because pain is not a requirement for progress.
Setup, posture, and arm-height rules that make stretches feel better
Shoulder stretching feels safer when posture is organized, because a stable ribcage and neutral neck help the shoulder blade glide rather than jam.
Arm height should always match comfort, meaning you can keep the arm below shoulder level if overhead positions feel pinchy or stressful.
Scapular movement matters, because the shoulder blade is the base of many shoulder motions, and a stuck shoulder blade can make the shoulder joint feel tight even when muscles are not “short.”
Neck relaxation helps too, because the upper traps often tighten when you lift arms without support or when you rush through a movement.
Quick setup checklist for upper body stretches
- Clear enough space to open your arms to the sides, because bumping objects encourages bracing.
- Choose a chair or wall for balance, because stability often reduces shoulder elevation.
- Set the screen or phone aside for a few minutes, because divided attention increases jerky movement.
- Pick a gentle effort level in advance, because deciding early prevents “just a little more” pushing.
Arm-height guide for careful stretching
- Low range: keep elbows close to the ribs when the shoulders feel sensitive, because the joint often tolerates this range best.
- Mid range: lift arms to about shoulder height only if it stays smooth, because this range is useful yet can feel pinchy for some people.
- High range: go overhead only when you feel stable and pain-free, because overhead positions magnify small alignment issues.
- Rule of thumb: choose the highest arm position that still lets the shoulders stay away from the ears.
Stretching routine for stiff shoulders: the 5-minute quick reset
This stretching routine for stiff shoulders can be done as a fast reset between tasks, because five minutes is often realistic even on packed days.
Slow pacing is still required, because rushing a short routine is the easiest way to create sudden, jerky movement.
Minute-by-minute structure
- Minute 1: breathing reset and shoulder drop practice.
- Minute 2: neck-friendly upper trap release and gentle head turns.
- Minute 3: chest opener at a wall and shoulder blade glide.
- Minute 4: upper-back “self-hug” stretch and thoracic rotation.
- Minute 5: wall slide in a comfortable range and a calm finish breath.
Minute 1: breathing reset with shoulder drop
Stand or sit tall with feet grounded, letting your ribs stack over your hips so the shoulders have a stable base.
Place one hand on the lower ribs and exhale slowly while imagining the shoulders melting down, then repeat for five calm breaths.
- Breathing cue: lengthen the exhale slightly, because longer exhales often reduce bracing.
- Posture cue: keep chin level, because looking up or down can add neck strain.
- Effort cue: aim for a 3–4 out of 10 stretch sensation later, because easy effort supports consistency.
Minute 2: neck-friendly release without pulling
Turn the head slowly left and right as if scanning the room, pausing for one breath at each side while keeping the shoulders heavy.
Bring the right hand to the left collarbone area lightly, then breathe out and feel the left shoulder soften without yanking the neck.
- Safety note: avoid aggressive ear-to-shoulder pulls, because sudden leverage can irritate sensitive neck tissues.
- Control note: keep movements small, because small movements often create better relief than big stretches.
Minute 3: wall chest opener with arm-height choice
Place one forearm on a wall with the elbow below shoulder height, then rotate the torso slightly away until the front of the chest feels a mild opening.
Switch sides after three slow breaths, keeping the shoulder away from the ear and the ribs from flaring upward.
- Start low: elbow below shoulder height for a safer first pass.
- Adjust gently: raise the elbow only if it stays smooth and pinch-free.
- Back off quickly: reduce rotation if the front shoulder feels sharp or unstable.
Minute 4: upper-back self-hug and gentle rotation
Wrap your arms around your torso in a loose hug, then exhale and reach the elbows forward slightly so the shoulder blades widen.
Unwrap slowly, cross arms over the chest, and rotate the ribcage gently left and right for two breaths each side.
- Focus: feel space between shoulder blades rather than forcing the neck forward.
- Reminder: skip rotation if twisting increases pain, because optional means optional.
Minute 5: wall slide for shoulder mobility routine practice
Stand with your back near a wall, keep ribs gently down, and slide the forearms upward only as high as you can without shrugging.
Finish with one long exhale, noticing whether the shoulders sit farther from the ears than they did five minutes ago.
- Range rule: stop before pinching, because wall slides should feel controlled and smooth.
- Tempo rule: move slowly, because speed often turns into shoulder hiking.
Stretching routine for stiff shoulders: the 12-minute complete sequence
This stretching routine for stiff shoulders is the more thorough option, because it includes both gentle back stretches for the upper spine and specific shoulder positions that improve comfort.
Desk worker shoulders often respond well to this longer version when it is repeated consistently with modest intensity.
How to time the full sequence
- Breath timing: hold most stretches for three to five slow breaths, because breath keeps intensity honest.
- Clock timing: hold most stretches for 20–40 seconds, because consistent time helps build a repeatable habit.
- Two-pass timing: repeat the tightest two moves once, because a second gentle pass often feels easier.
Step 1: shoulder blade circles to reduce “stuck” feeling
Stand tall and imagine drawing small circles with the bottom tips of your shoulder blades, moving slowly so the motion stays controlled and calm.
Reverse direction after five circles, because balanced movement tends to feel better than repeating only one direction.
- Keep the neck relaxed, because neck tension can steal the movement.
- Keep the circles small, because small motion is often enough when shoulders feel stiff.
- Keep breathing easy, because breath-holding usually means the circles are too aggressive.
Step 2: supported upper trap softening with breath
Rest one hand lightly on the top of the opposite shoulder, then exhale as you let that shoulder drop away from the ear without pulling the head sideways.
Switch sides after three breaths, because symmetrical practice reduces the urge to “fix” only one side.
- Pressure note: use a light touch, because heavy pressure can trigger guarding.
- Comfort note: reduce the head movement to nearly zero, because the drop is the goal, not a big neck bend.
Step 3: doorway-free pec opener at the wall
Place the palm or forearm on a wall, keep the elbow below shoulder height, and gently turn the chest away until the front shoulder feels open rather than strained.
Switch sides after three to five breaths, keeping the ribs stacked so the stretch stays in the chest instead of the lower back.
- Arm-height rule: lower is safer when shoulders feel reactive, so choose comfort over range.
- Pinch rule: back off immediately if the front shoulder pinches, because pinching is not productive stretching feedback.
Step 4: cross-body shoulder stretch with stable posture
Bring one arm across the chest at a height that feels easy, then use the other hand to guide it closer without twisting the torso.
Hold the position while keeping the shoulder down and the neck long, then switch sides after three to five breaths.
- Set the shoulder down first, because an elevated shoulder changes the sensation.
- Guide gently second, because aggressive pulling can irritate the joint.
- Breathe steadily third, because calm breathing helps the tissue soften.
Step 5: triceps and side-body stretch with careful arm height
Lift one arm and bend the elbow so the hand moves toward the upper back, then use the other hand to support the elbow without forcing it behind the head.
Lean slightly to the opposite side if it feels good, because a small side bend can open the lat and rib area without added strain.
- Arm-height option: keep the elbow forward rather than flared, because that often feels safer for tight shoulders.
- Neck option: keep the chin level, because looking up can compress the neck.
Step 6: seated thoracic extension to open the upper back
Sit tall on a chair, place hands behind the head lightly, and lift the chest upward as you inhale, stopping before the lower back arches hard.
Return to neutral on the exhale, repeating five times with a smooth tempo that feels controlled.
- Anchor the ribs, because rib flare can dump pressure into the low back.
- Keep elbows comfortably wide, because forcing them back can stress the shoulders.
- Use small movement, because small extension often creates big relief for desk worker shoulders.
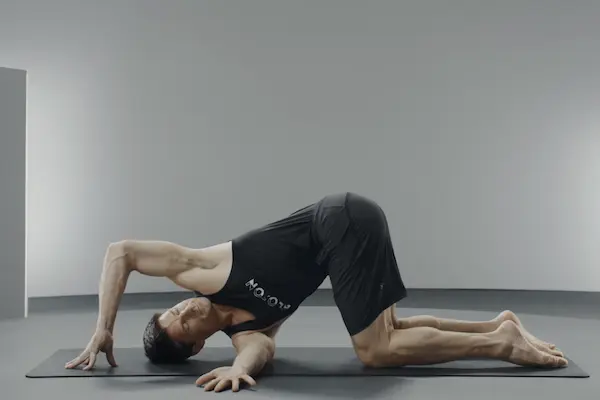
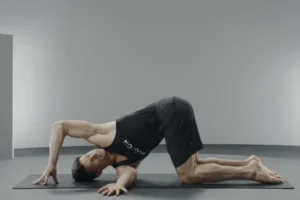
Step 7: thread-the-needle rotation for upper back and shoulder blade area
From hands-and-knees, slide one arm under the other and rotate gently until you feel a mild stretch behind the shoulder and across the upper back.
Hold for two to four breaths, then return slowly and repeat on the other side, keeping the movement smooth and never forced.
- Support option: place a pillow under the shoulder or head, because support reduces strain.
- Skip option: avoid this move if kneeling hurts, because a seated rotation can replace it.
Step 8: wall slides with “no shrug” rule
Stand facing a wall, place forearms on it, and slide upward only to the point where your shoulders can stay away from your ears.
Lower slowly and repeat five times, because repetition builds control without needing intense stretching.
- Ribs stay down, because rib flare often creates fake range and real discomfort.
- Elbows stay comfortable, because forcing a narrow position can irritate shoulders.
- Tempo stays slow, because fast slides usually turn into a shrug.
Step 9: self-hug and upper-back widening to finish
Wrap arms in a light hug again, exhale, and reach elbows forward until you feel space between the shoulder blades without collapsing the neck.
Stand tall after releasing, then take one slow breath while noticing whether your shoulders sit lower and your chest feels more open.
- Finish cue: walk around for 20–30 seconds if it feels good, because gentle movement helps the new range feel natural.
Upper body stretches add-ons for specific tight spots
Some days you will feel one “hot spot,” and targeted upper body stretches can help when they stay gentle and do not provoke symptoms.
Careful choices matter, because tired shoulders can be sensitive to aggressive angles.
Add-on options you can try one at a time
- Forearm and wrist stretch: gentle wrist extension and flexion helps when mouse use makes the whole arm tense.
- Neck rotation resets: slow head turns can reduce the urge to clamp the jaw and shrug.
- Scapular retraction pulses: tiny shoulder blade squeezes can wake up posture without hard pinching.
- Supported child’s pose with arms forward: a pillow-supported version can open the lats without forcing overhead range.
Add-ons that require extra caution
- Deep sleeper-style internal rotation can irritate some shoulders, so it should be skipped if pinching appears or if you feel uncertain.
- Strong overhead hangs are not beginner friendly when shoulders are already stiff, so keep overhead work controlled and low intensity.
- Fast arm circles can become jerky without you noticing, so slow circles or wall slides are usually the safer choice.
Desk worker shoulders: how often to repeat the routine
Desk worker shoulders usually respond best to frequent, small resets, because posture tension tends to build gradually and then suddenly feel “stuck.”
Consistency beats intensity here, so aim for a repeat schedule that fits your day rather than a perfect plan you never use.
A quick workday routine can be as small as two minutes, because a short sequence repeated several times often reduces stiffness more reliably than one long session.
Evening practice can still help, because the body often relaxes more when work demands are done and breathing becomes naturally slower.
Simple frequency plans
- Light plan: do the 5-minute version once midday and once late afternoon, because that timing matches common tension peaks.
- Steady plan: do the 12-minute version three times per week, then use the 5-minute reset on the other days.
- Micro-break plan: do one minute of breathing plus one wall chest opener per side every 60–90 minutes.
- Stress-day plan: repeat the breathing reset and self-hug three times, because calming the nervous system can lower shoulder bracing.
Workday cues that make movement more likely
- After each meeting: do shoulder blade circles, because the body often tightens during focused listening.
- Before lunch: do the wall chest opener, because mid-day posture drift is common.
- After long typing blocks: do cross-body stretch and a slow head turn, because repetitive arm positions tighten quickly.
Technique reminders: posture, shoulder blades, and “no jerks” movement
Jerky motion is risky when shoulders feel stiff, because sudden changes can trigger protective tightening and make the area feel more reactive afterward.
Controlled movement is safer, because control lets you notice early warning signs like pinching, breath-holding, and shrugging.
Shoulder blades should glide rather than freeze, because stiff shoulders often involve a shoulder blade that is stuck forward, upward, or tilted in a way that makes overhead motion uncomfortable.
Neck position matters too, because a forward head posture can keep the upper traps engaged even during a stretch that is supposed to relax them.
Posture cues that protect the neck and shoulders
- Keep ribs stacked over hips, because rib flare can push the shoulders into an unstable position.
- Keep chin level, because craning the head forward encourages shrugging.
- Keep shoulders away from ears, because elevation often signals bracing rather than mobility.
- Keep elbows supported when possible, because unsupported arms make the upper traps work harder.
Common mistakes and safer swaps
- Mistake: yanking the arm into a cross-body stretch.Swap: guide the arm slowly and stop early, because slow pressure helps the joint feel safe.
- Mistake: forcing elbows high during chest openers.Swap: keep the elbow below shoulder height, because lower arm height often reduces pinching.
- Mistake: shrugging during wall slides.Swap: slide only to the height where shoulders stay down, because range without shrug is the real goal.
- Mistake: holding breath while stretching.Swap: reduce intensity until breathing is easy, because easy breathing is your best safety signal.
Options to shorten or extend the stretching routine for stiff shoulders
Busy days call for shorter routines, while calmer days can handle longer holds, yet both approaches should still feel gentle and controlled.
Longer sessions should feel slower and easier rather than harder, because extra time is meant to reduce stress, not increase it.
2-minute emergency reset
- Take five slow breaths while dropping shoulders on each exhale.
- Do one wall chest opener per side for two breaths each.
- Finish with a self-hug for two breaths, then return to work with a softer neck.
5-minute desk-friendly version
- Use the full 5-minute quick reset section above, because it was designed as a repeatable workday tool.
12-minute standard shoulder mobility routine
- Use the complete sequence section above, because it balances chest opening, upper-back mobility, and careful arm positioning.
20-minute slow version for high-stress days
- Repeat the complete sequence once with 30–40 second holds.
- Repeat the wall chest opener and self-hug for a second pass, because those moves often calm desk worker shoulders quickly.
- Add two minutes of breathing at the end, because a downshifted nervous system often keeps shoulders lower afterward.
FAQ for a stretching routine for stiff shoulders
Should these stretches be done before workouts or after?
Light mobility before exercise can be helpful, while longer holds often feel better after activity, so choose gentle movement first and save longer stretching for the end when you are warm.
How do I know if my arm height is too high?
Pinching, shrugging, or breath-holding usually means the arm height is too high, so lowering the elbow and keeping the shoulder down is the safer adjustment.
What if one shoulder feels much tighter than the other?
Asymmetry is common, yet sharp pain or radiating symptoms should be evaluated medically, so keep the tighter side gentler and consider professional guidance if symptoms persist.
Can desk worker shoulders improve with short sessions?
Short sessions often work well because frequency reduces the buildup of tension, especially when you pair the routine with better breathing and fewer prolonged shrugging positions.
When should I seek medical care?
Medical care is the priority when pain is sharp, worsening, persistent, or accompanied by numbness, tingling, weakness, or significant loss of function.
Printable checklist: stretching routine for stiff shoulders
- Start with breathing and shoulder drops, because a calmer system releases more easily.
- Keep arm height comfortable, because lower angles often prevent pinching.
- Use wall chest openers with ribs stacked, because rib flare can stress the low back and shoulders.
- Include self-hug upper-back widening, because it reduces the “stuck between shoulder blades” feeling.
- Practice wall slides without shrugging, because control matters more than height.
- Repeat small resets during the day, because desk worker shoulders respond to frequency.
- Stop if symptoms feel sharp or nerve-like, because safety comes before completion.
Closing guidance for gentle, repeatable progress
Relief is often the result of small, consistent changes rather than dramatic stretches, so keeping this stretching routine for stiff shoulders easy and repeatable is a smart long-term approach.
When in doubt, choose the gentlest option, move slowly, avoid sudden jerky movements, and seek medical care if pain is persistent, sharp, or worrying.