When your body feels curious about yoga but your mind wants something simple, this beginner yoga stretching routine at home offers a calm, gentle way to start moving.
Instead of chasing perfect shapes, you will follow yoga style stretches with clear cues, easy modifications, and frequent reminders to stop before pain and choose safety first.
Beginner yoga stretching routine at home: how to use this guide gently

A beginner yoga stretching routine at home works best when it feels unpressured, because the goal is comfort and consistency rather than intensity or performance.
Most people enjoy this sequence in about 10–15 minutes, although a shorter version is included for tired days when doing less is the smartest choice.
Low expectations matter, since a gentle plan you repeat is usually more helpful for at home flexibility than a hard session you avoid.
Slow transitions are part of the routine, because sudden movement can trigger bracing in the neck, shoulders, and hips, especially if you are already tense.
Support is encouraged, because blocks, pillows, folded towels, or a sturdy chair can make beginner friendly poses feel safer and more relaxing.
Any sharp, worsening, or persistent pain should be assessed by a qualified healthcare professional, because an article cannot diagnose injuries or medical conditions.
Quick setup checklist for a calm home session
- Choose a clear space where you can extend your arms without bumping furniture, because unexpected contact can make you tense.
- Dim the lights if possible, because softer lighting can help your nervous system shift from “doing” to “settling.”
- Wear comfortable clothing that lets you breathe easily around ribs and belly, because restrictive clothes can encourage shallow breathing.
- Grab one pillow or folded blanket, because extra support can turn a challenging pose into a soothing one.
- Pick a gentle intensity target, because deciding early prevents “just a little more” pushing later.
Safety rules you will see repeated often
- Stop before pain, because pain is not a helpful flexibility signal and it can increase protective tension.
- Skip any pose that feels wrong in your body, because yoga is adaptable and your comfort matters more than finishing a list.
- Move slowly and avoid jerky transitions, because smooth movement is usually safer for joints and calmer for the nervous system.
- Seek professional guidance for specific injuries, because individualized advice is important when tissues are healing or symptoms persist.
Why yoga style stretches can feel so relaxing for tense beginners
Yoga style stretches often feel different from “regular” stretching because they combine breath, attention, and gentle whole-body positioning rather than isolating one muscle aggressively.
Calm breathing can reduce bracing, and reduced bracing can make movement feel smoother even when you are not pushing deeper into any stretch.
Slow holds help your brain trust the position, which can lower the urge to tighten defensively, especially around shoulders that creep up toward the ears.
Consistency improves at home flexibility over time, because tissues and nervous system responses change gradually with repeated safe exposure.
Non-dogmatic practice matters, since you do not need to believe anything special about yoga to benefit from mindful, gentle movement.
Good days and stiff days will both happen, so the routine is designed to adapt rather than to demand the same range every session.
Common reasons beginners feel tight during the day
- Long sitting can shorten the front of the hips and reduce rib movement, which may contribute to a feeling of overall stiffness.
- Stress can change breathing patterns, which often increases tension in the neck, jaw, and upper chest without you noticing.
- Repetitive tasks can overwork certain muscles, which may make you feel “stuck” even when there is no single injury.
- Sleep positions can leave joints feeling stiff, which is why gentle movement often feels helpful before you push into a busy day.
Beginner yoga stretching routine at home: breathing that stays simple
Breathing is included because it helps you move with less strain, yet complicated techniques are not required for this beginner yoga stretching routine at home.
Comfortable breaths are enough, and forcing deep breathing can sometimes feel activating, especially if you feel anxious or sensitive.
A longer exhale often helps you relax muscles, because exhaling slowly can signal “safe” to the nervous system.
Breath can also guide intensity, because breath-holding is a practical sign that a stretch has become too strong.
Three easy breathing options you can rotate between
- Soft nasal breathing, with a gentle inhale and a slightly longer exhale, which often feels calming without effort.
- Inhale through the nose and exhale through softly parted lips, which can help you slow the exhale without strain.
- Breath-count pacing, such as inhaling for three and exhaling for four or five, which keeps the routine steady when your mind wanders.
Breath rules that protect comfort
- Choose smaller breaths if deep breaths feel tight in your chest, because the goal is calm, not intensity.
- Return to normal breathing if lightheadedness appears, because safety matters more than technique.
- Use the exhale to soften into a pose, because easing into range is usually gentler than pushing suddenly.
Beginner yoga stretching routine at home: the 10–15 minute gentle sequence
This beginner yoga stretching routine at home moves from upper body to spine and hips, then finishes with calming floor poses that often feel bedtime-friendly.
Each section includes beginner friendly poses, modifications, and reminders to stop before pain, because your body’s feedback is the most important guide.
A yoga mat is optional, since a carpet or a folded blanket can work, and comfort is more important than equipment.
If any movement creates sharp pain, tingling, numbness, or a worrying symptom, stopping and seeking medical advice is the cautious and appropriate choice.
Sequence overview for quick reference
- Arriving posture and shoulder softening.
- Neck release without pulling.
- Chest and front-shoulder opener with safe arm height.
- Cat–cow spine waves.
- Thread-the-needle upper-back stretch.
- Child’s pose or supported rest.
- Low lunge hip flexor opener.
- Half split hamstring stretch.
- Figure-four glute stretch on your back.
- Supine twist, small and optional.
- Final relaxation with slow exhale focus.
Pose 1: Arriving posture in easy seat or chair
Sit on a cushion, folded blanket, or a chair with feet grounded, because support often makes the spine feel taller without forcing posture.
Let the shoulders drop away from the ears as you exhale, then imagine the crown of the head floating upward while the ribs stay soft.
- Place hands on thighs and relax the jaw, because jaw tension often mirrors shoulder tension.
- Inhale gently into the ribs, then exhale a little longer and feel the shoulders melt down.
- Repeat five calm breaths while keeping the face soft, because softness signals safety to the body.
- Modification: sit against a wall if you feel tired, because support can reduce bracing.
- Stop-before-pain reminder: skip upright sitting if it aggravates symptoms, because lying down breathing is a valid alternative.
- Professional-care reminder: consult a clinician if sitting itself causes sharp pain or neurological symptoms, because that pattern deserves evaluation.
Pose 2: Shoulder rolls and shoulder-blade glides
Shoulders often tighten from stress and screens, so gentle rolling can begin the release without deep stretching.
Slow circles feel safer than fast circles, because speed can turn into jerky movement without you noticing.
- Roll shoulders up, back, and down for five slow repetitions, keeping the neck long and relaxed.
- Reverse the direction for five slow repetitions, letting the movement stay smooth and quiet.
- Glide shoulder blades slightly back and down, then release them forward without collapsing the chest.
- Arm-height note: keep elbows low, because low arm positions usually reduce shoulder pinching for beginners.
- Desk-worker hint: imagine the shoulders “unshrugging,” because the goal is space between ears and shoulders.
- Stop-before-pain reminder: reduce range if pinching occurs, because smaller motion is still effective.
Pose 3: Neck release with gentle turns
Neck movement should be small and controlled, because aggressive neck stretching can irritate sensitive tissues.
Rotation often feels safer than side pulling, so you will use slow turns rather than yanking the head toward the shoulder.
- Tuck the chin slightly as if making a tiny “yes,” then return to neutral without dropping the head heavily.
- Turn the head slowly left, pause for one soft breath, then return to center with control.
- Turn the head slowly right, pause for one soft breath, then return to center smoothly.
- Repeat the left-right turns one more round if it feels calming, keeping shoulders heavy and relaxed.
- Safety note: skip neck work if dizziness appears, because safety matters more than completion.
- Stop-before-pain reminder: stop immediately if sharp pain or nerve-like symptoms appear, because those signs deserve medical attention.
- Modification: keep the movement extremely small, because tiny ranges can still reduce stiffness.
Pose 4: Wall chest opener with beginner-friendly arm height
A chest opener can reduce the rounded posture many beginners carry, yet arm height must stay comfortable to avoid shoulder pinching.
Lower arm placement is often safer than high arm placement, especially when shoulders feel tight or reactive.
- Stand beside a wall and place your forearm on it with the elbow below shoulder height.
- Turn your chest gently away from the wall until you feel a mild stretch across the chest and front shoulder.
- Hold for three to five slow breaths, then step back to neutral and switch sides.
- Modification: keep the hand lower on the wall if your shoulder feels sensitive, because lower angles often feel safer.
- Posture cue: keep ribs stacked over hips, because rib flare can shift strain into the lower back.
- Stop-before-pain reminder: back off immediately if the front shoulder pinches, because pinching is not helpful feedback.
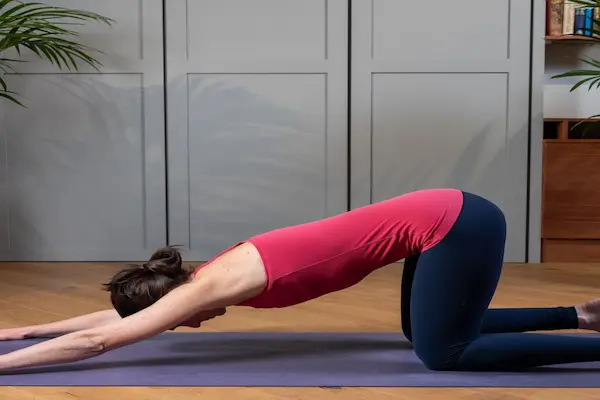
Pose 5: Cat–cow spine waves for gentle mobility
Cat–cow is a classic yoga-inspired warm movement because it invites the spine to move with the breath rather than forcing a stretch.
Countertop cat–cow is an excellent alternative when kneeling feels uncomfortable, because support changes the load without removing the benefit.
- Come to hands and knees, or place hands on a countertop with feet hip-width apart.
- Inhale and gently arch the back, letting the chest widen while the neck stays long and neutral.
- Exhale and round the back, letting shoulder blades spread while the belly softens inward.
- Repeat for six slow cycles, moving like a wave rather than snapping between shapes.
- Wrist modification: use fists or forearms if wrists feel sore, because comfort supports relaxation.
- Knee modification: place a folded blanket under knees if kneeling is sensitive, because cushioning can reduce pressure.
- Stop-before-pain reminder: reduce range if your lower back feels pinchy, because cat–cow should feel smooth and mild.
Pose 6: Thread-the-needle for upper back and shoulder blade area
Thread-the-needle targets the upper back and back-of-shoulder region, which can feel tight when you carry tension near the shoulder blades.
Support makes this pose gentler, so using a pillow under the head or shoulder can reduce strain.
- From hands and knees, slide your right arm under your left arm, palm facing up, and let the right shoulder lower gently.
- Rest your head on the floor or on a pillow, then breathe slowly for two to four breaths.
- Press into the left hand to return carefully, then switch sides with the same slow control.
- Modification: keep more weight in the supporting hand if the shoulder feels unstable, because stability matters more than depth.
- Neck comfort cue: avoid turning the head sharply, because neck rotation should stay comfortable and easy.
- Stop-before-pain reminder: skip this pose if shoulder pain increases, because gentle alternatives like self-hug stretches can replace it.
Pose 7: Child’s pose or supported rest
Child’s pose can feel soothing for many people, yet not every body loves deep knee flexion, so supported rest is always a valid option.
Using a pillow under the chest can make this pose feel more like relaxation and less like effort.
- From hands and knees, bring big toes closer and widen knees slightly if that feels better for the hips.
- Send hips back toward heels slowly, stopping early if knees or ankles feel uncomfortable.
- Rest the torso on a pillow or folded blanket, then breathe for four to six slow breaths.
- Modification: keep hips higher and place more support under the torso, because less depth can still feel calming.
- Knee caution: skip child’s pose if knees feel painful, because a reclined breathing position can replace it safely.
- Stop-before-pain reminder: exit slowly if discomfort grows, because sudden exits can create a bracing response.
Pose 8: Low lunge for hip flexors and front-of-hip tightness
Hip flexors can feel tight after sitting, and low lunge opens the front of the hip when it is kept gentle and well-supported.
Stacking the ribs over the pelvis helps protect the lower back, because excessive arching can create pressure rather than relief.
- Step the right foot forward between the hands, then lower the left knee onto a folded blanket for cushioning.
- Bring hands onto the right thigh or a chair for support, then tuck the pelvis slightly as if zipping up snug jeans.
- Shift forward just a few centimeters until you feel a mild stretch in the front of the left hip, then hold for three to five breaths.
- Step back slowly and switch sides, keeping the same calm pace and modest range.
- Modification: keep hands on a chair and do a standing version if kneeling is uncomfortable, because comfort changes the whole experience.
- Intensity cue: keep it around 3–5 out of 10 effort, because low intensity is usually safer for beginners.
- Stop-before-pain reminder: stop if you feel sharp back pain, because that can signal the position is not right for you today.
Pose 9: Half split for hamstrings with soft knees
Hamstrings often feel “grabby” for beginners, so half split should be done with a soft knee and a long spine rather than a forced forward fold.
A smaller hinge that keeps breathing calm often improves at home flexibility better than a deep hinge that triggers bracing.
- From low lunge, shift hips back and straighten the front leg only as much as feels comfortable, keeping a slight bend if needed.
- Flex the front foot gently and hinge forward from the hips until a mild stretch appears behind the thigh.
- Hold for three to five breaths, then return to lunge slowly and step out carefully.
- Modification: place hands on blocks, a chair, or the bed edge, because support reduces strain and makes the stretch steadier.
- Back-protection cue: avoid rounding hard through the lower back, because hamstring stretching should not become back discomfort.
- Stop-before-pain reminder: back off if you feel sharp pulling behind the knee, because that sensation usually means the range is too deep.
Pose 10: Figure-four glute stretch on your back
Glutes and outer hips influence how the lower back feels, so this pose often creates a whole-body sense of ease when done gently.
Foot flexion helps protect the knee, which is why the ankle stays active without being tense.
- Lie on your back with knees bent and cross the right ankle over the left thigh, creating a clear “4” shape.
- Hold behind the left thigh and draw it toward you until you feel a mild stretch in the outer right hip.
- Stay for four to six breaths, then switch sides slowly and repeat with the same calm intensity.
- Modification: keep the bottom foot on the floor and skip pulling if the deeper version feels too intense.
- Knee comfort cue: avoid pressing the knee down, because pressure can irritate the joint for some bodies.
- Stop-before-pain reminder: stop if knee pain appears, because this pose should feel like a hip stretch rather than a knee strain.
Pose 11: Supine twist, small and optional
A gentle twist can feel soothing for the spine and ribs, yet twists should stay small and comfortable, especially for beginners.
Skipping twists is completely fine, because your routine remains effective without any move that feels uncertain.
- Lie on your back with knees bent, then let both knees drift a small amount to the right while shoulders stay heavy.
- Hold for two to four breaths, then return to center slowly and repeat to the left.
- Keep the range small enough that breathing stays easy and the face stays relaxed.
- Modification: place a pillow between the knees or under the top knee, because support can reduce strain.
- Stop-before-pain reminder: stop immediately if twisting increases pain, tingling, or radiating symptoms, because those signs deserve medical evaluation.
- Professional-care reminder: consult a clinician for specific injuries or disc-related diagnoses, because twists may need individualized guidance.
Pose 12: Final relaxation with long, soft exhales
Relaxation is a real part of yoga-inspired stretching, because the downshift teaches the body that it can stop bracing and start resting.
A calm finish also helps your session feel complete, which can make it more likely you will repeat the beginner yoga stretching routine at home tomorrow.
- Lie on your back with a pillow under knees or lie on your side with a pillow between knees, choosing the position that feels most restful.
- Place one hand on the belly and let the other arm rest comfortably, then inhale gently and exhale a little longer.
- Stay for one to three minutes, letting the exhale soften shoulders, jaw, and hips without forcing anything.
- Low-light suggestion: keep eyes closed and the room dim, because reducing stimulation helps the nervous system settle.
- Tired-day permission: end here early when exhaustion is high, because fewer moves are always allowed.
- Stop-before-pain reminder: adjust props or positions if discomfort grows, because rest should feel safe and supportive.
Beginner yoga stretching routine at home: how to shorten it on busy days
A shorter routine protects consistency, because a small session repeated often usually supports at home flexibility better than an occasional long session.
Tiredness is not a failure, so choosing fewer beginner friendly poses is a practical, kind way to keep the habit alive.
5-minute mini sequence that still feels “complete”
- Arriving posture with five slow breaths.
- Cat–cow for four slow cycles.
- Low lunge for three breaths per side.
- Figure-four for four breaths per side.
- Final relaxation for five long exhales.
2-minute “I’m very tired” option
- Lie down and do five long exhales, because a longer exhale can relax muscles quickly.
- Do one figure-four side for three breaths, then switch sides for three breaths, because hips often hold daily tension.
- Stop and rest, because sleep and recovery are part of flexibility progress.
Beginner yoga stretching routine at home: how to extend it without pushing harder
Extra time should make the routine slower and softer, because gentle repetition is often more calming than adding advanced positions.
Longer holds can be useful when stress is high, yet intensity should remain low enough that breathing stays smooth and unforced.
Easy ways to extend the routine to 20 minutes
- Add two breaths to each hold, because time can increase relaxation without changing the pose.
- Repeat cat–cow and thread-the-needle for one additional round, because upper-back mobility often improves with repetition.
- Hold child’s pose with support for eight breaths, because supported rest can calm the nervous system.
- Spend a full three to five minutes in final relaxation, because your body often settles most at the end.
Add-ons that stay beginner-friendly and non-dogmatic
- Seated side bend for two to three breaths per side, because ribs can feel tight from shallow breathing.
- Wrist and forearm stretch for two breaths per side, because phone and mouse use can tighten the whole upper body.
- Gentle ankle circles while seated, because feet and calves influence comfort in standing and walking.
Common mistakes beginners make with yoga style stretches, and safer swaps
Most problems come from pushing too far too soon, because intensity often triggers protective tightening rather than relaxation.
Jerky movement is another common issue, because rushing transitions can turn a gentle stretch into a sudden strain.
Breath-holding shows up frequently, because people try to “get deeper,” yet calm breathing is a better guide than ambition.
Mistakes to avoid during a beginner yoga stretching routine at home
- Forcing arm height overhead when shoulders pinch, because shoulder joints vary and comfort should decide the range.
- Locking knees during hamstring work, because a soft knee often reduces strain behind the knee.
- Overarching the lower back in lunges, because rib flare can shift pressure into the spine instead of the hip flexors.
- Bouncing in any pose, because bouncing can increase guarding and reduce your sense of control.
Safer swaps that keep the routine gentle
- Swap deep forward folds for small hip hinges with support, because support often makes stretching calmer and safer.
- Swap overhead arm positions for cross-body shoulder stretches, because lower arm angles can reduce pinching for beginners.
- Swap kneeling poses for chair-supported versions, because knee comfort matters for consistency.
- Swap twists for breathing and rest, because rest can be the right move on sensitive days.
How often to practice for at home flexibility without pressure
Frequency matters more than intensity, because tissues and nervous system responses adapt best to repeated safe exposure.
Three to five sessions per week is realistic for many beginners, yet daily short sessions can work well when effort stays gentle.
Progress can look like smoother movement and less bracing, even if your range does not dramatically change in the first week.
Injury history changes what is appropriate, so professional guidance is wise when you have a specific diagnosis or a recent strain.
Simple schedules you can choose from
- Steady plan: do this beginner yoga stretching routine at home three times per week, then do the 5-minute mini sequence on other days.
- Daily gentle plan: do the mini sequence every day, because small consistent sessions can support flexibility without fatigue.
- Weekend reset plan: do the full routine twice during the week, then do the extended version once on a calmer weekend day.
How to tell if you are doing too much
- Increased soreness that lasts longer than a day can mean intensity was too high, so smaller range and shorter holds are smarter.
- Worsening pain is a sign to stop and seek professional advice, because stretching should not escalate symptoms.
- Feeling anxious during the routine suggests the pacing is too fast, so slower breathing and more support can help.
FAQ: beginner yoga stretching routine at home for curious beginners
Do I need to be flexible to start yoga-inspired stretching?
Flexibility is not a requirement, because yoga style stretches can be modified and the goal is gentle exploration rather than perfect range.
Should I stretch through pain to improve faster?
Pain is a reason to stop and adjust, because pushing through pain can increase guarding and may worsen symptoms that need medical attention.
What if I have a specific injury or diagnosis?
Specific injuries deserve individualized guidance, so consulting a qualified professional is the safest choice before following general routines.
Is it normal for one side to feel tighter?
Asymmetry is common, yet sharp or radiating symptoms should be evaluated, so keep the tighter side gentler and avoid forcing it to match.
Can I do this routine at night to relax?
Evening practice can feel calming when intensity stays low, especially if you dim lights and keep transitions slow and quiet.
Notice about independence and third parties
Notice: this content is independent and does not have affiliation, sponsorship, or control by any institutions, platforms, or third parties mentioned or implied.
For persistent symptoms, sharp pain, or concerns about injury, a qualified healthcare professional is the appropriate source for individualized guidance.
Printable recap: beginner yoga stretching routine at home
- Arriving posture with slow breathing and shoulder softening.
- Neck turns without pulling or yanking.
- Wall chest opener with elbow below shoulder height.
- Cat–cow spine waves with smooth, breath-led pacing.
- Thread-the-needle with optional pillow support.
- Child’s pose or supported rest, with comfort as the priority.
- Low lunge hip opener with ribs stacked and gentle pelvic tuck.
- Half split hamstring stretch with a soft knee and long spine.
- Figure-four glute stretch with foot flexed for knee comfort.
- Optional small supine twist only if it feels immediately comfortable.
- Final relaxation with long exhales and a supported resting position.
Closing: keep it calm, keep it optional, keep it repeatable
Consistency builds comfort when you practice a beginner yoga stretching routine at home in a way that feels safe, adaptable, and free from pressure.
Gentle effort, slow breathing, and the willingness to stop before pain will usually support better outcomes than forcing range, especially when your body is learning to trust movement again.