
A full-body stretch at home feels best when it is simple enough to repeat, gentle enough to trust, and clear enough that you never wonder what to do next.
Below you will follow an orderly, head-to-toe sequence with practical hold tips, easy timing options, and a calm structure that supports beginners who want consistency.
Full body stretching routine at home: what you need before you begin
Minimal setup removes friction, and less friction usually means you will actually do the routine again tomorrow instead of postponing it until “someday.”
A small open space beside your bed, couch, or a clear patch of floor is enough, because the movements are designed to fit real homes rather than ideal studios.
Comfortable clothing helps, since stiff waistbands and restrictive sleeves can subtly encourage you to hold your breath or rush through the positions.
A folded towel, a pillow, or a sturdy chair can be useful for support, and using support is a smart choice rather than a sign that you are doing something wrong.
Stable footing matters, so bare feet on a non-slip surface often feels best, while socks on slick floors can make you tense and reduce the stretch quality.
Gentle music is optional, yet many beginners prefer silence at first so they can notice subtle signals like clenching, bracing, or breath-holding.
Quick home checklist
- Clear enough space to extend both arms without bumping a table edge.
- Keep a chair nearby for balance, especially during standing hip and calf stretches.
- Set a simple timer or plan to count breaths, so you stay present instead of clock-watching.
- Choose a “comfort rule” before starting, so you do not negotiate with yourself mid-stretch.
- Decide whether you want a short version or an extended version, so the routine matches your energy today.
Comfort-range rules for beginners
Gentle stretching should feel like a steady pull, warmth, or mild pressure, while sharp pain, tingling, numbness, or pinching are clear signs to stop and adjust.
Breathing should remain smooth and unforced, because a held breath often means the body has moved past a comfortable range and is bracing for protection.
Slow transitions keep tissues calm, and calm tissues tend to allow more movement without any forcing.
Small ranges are effective, especially early on, because the nervous system often relaxes when it senses that you are staying safe.
Medical conditions, recent injuries, or persistent symptoms deserve individualized guidance, so consider checking with a qualified professional if you are uncertain about what is appropriate.
How to choose intensity and holds for head to toe stretches
Intensity is less about how far you go and more about how well you can relax while you are there, which is why “gentle” can be surprisingly productive.
Breath-count holds are beginner-friendly, because breaths naturally slow you down while keeping the routine flexible from one day to the next.
Time-count holds are also useful, because they keep the plan consistent when your breathing changes due to stress, allergies, or a busy mind.
For most positions in this routine, three to five slow breaths or about twenty to forty seconds is enough, especially when you are repeating the sequence regularly.
Longer holds can be added later, yet consistency tends to matter more than long duration, particularly in a beginner flexibility plan that aims to feel sustainable.
Two simple holding methods
- Breath method: inhale gently to find length, then exhale to soften into a comfortable range for three to five breaths.
- Timer method: hold for twenty to forty seconds, then ease out slowly, letting the body feel safe throughout the transition.
Quick “effort scale” you can use mid-routine
- 2–3 out of 10 feels light and soothing, which is perfect on stiff days and excellent for building consistency.
- 4–5 out of 10 feels like a clear stretch that is still calm, which is a practical target for most people most days.
- 6 out of 10 can be okay occasionally, yet it should never force you to grimace, hold your breath, or rush to escape.
Full body stretching routine at home: the complete body routine from head to toe
This complete body routine flows from the neck down to the feet, so the sequence feels organized, repeatable, and easy to remember.
Support tools are included as options, since comfort and stability often unlock better results than trying to balance through tension.
Each stretch includes clear setup steps, breathing suggestions, and cues to keep the sensation in a safe, comfortable range.
Step 1: Standing or seated reset with calm breathing
Begin standing tall or sitting at the front edge of a chair, choosing whichever position feels steadier in your body right now.
Place one hand on your lower ribs and the other on your belly, then let your shoulders soften down while your jaw relaxes.
Inhale slowly through the nose if comfortable, letting the ribs expand sideways instead of lifting the shoulders upward.
Exhale gently and feel the belly soften, allowing the chest to settle so the neck does not tense.
Stay for three to five breaths, noticing which areas feel tight without judging those sensations as “good” or “bad.”
- Breathing cue: move into any stretch on the exhale, then ease off slightly on the inhale.
- Posture cue: imagine the crown of your head floating up while the tailbone drops heavy.
- Safety cue: reduce the breath depth if deep breathing makes you feel lightheaded.
Step 2: Neck nods and gentle turns
Necks often feel stiff because they stayed still for hours, so the goal here is lubrication and ease rather than a deep pull.
- Make a tiny “yes” nod by tucking the chin slightly, then return to neutral without dropping the head far forward.
- Turn your head slowly to the left as if scanning the room, pause for one soft breath, then return to center.
- Turn your head slowly to the right with the same calm pace, keeping shoulders heavy and relaxed.
- Add a very small ear-toward-shoulder tilt only if it feels smooth, stopping well before any pinch appears.
- Breathing cue: exhale into the turn, then inhale as you return to center.
- Form cue: keep the chin level so you avoid cranking up or down.
- Modify: skip side tilts if dizziness, tingling, or sharp discomfort appears.
Step 3: Shoulder rolls and shoulder blade glides
Shoulders tighten easily when the day includes screens, driving, or stress, so slow circles help restore a sense of space without requiring big movement.
- Roll both shoulders up, back, and down in a slow circle for five repetitions.
- Reverse the direction and roll up, forward, and down for five repetitions.
- Slide your shoulder blades gently down and slightly together, then let them relax forward without collapsing.
- Breathing cue: inhale as the chest widens, then exhale as the shoulders settle away from the ears.
- Form cue: keep the neck long, since shrugging can increase tension instead of reducing it.
- Modify: make the circles smaller if shoulders feel pinchy.
Step 4: Wrist and forearm release for everyday tightness
Hands and forearms work hard during typing, gripping, and phone use, so gentle wrist movement can make the upper body feel more relaxed overall.
- Extend one arm forward with the elbow soft, then point fingers down gently for a mild forearm stretch.
- Use the other hand to add only light pressure, keeping the sensation comfortable rather than intense.
- Switch to fingers up gently, letting the wrist open in the opposite direction for balance.
- Repeat on the other arm, using two to three breaths per position.
- Breathing cue: exhale as you find the stretch, then inhale while maintaining a calm, steady hold.
- Form cue: keep the shoulder down, because a lifted shoulder can steal the stretch from the forearm.
- Modify: reduce wrist angle if you feel nerve-like tingling into the fingers.
Step 5: Side body reach to open ribs and lats
Side bending can feel like a “whole body” stretch because it opens ribs, lats, and the waistline area where many people hold subtle tension.
- Stand with feet hip-width apart or sit tall, then raise your right arm overhead without shrugging.
- Place the left hand on the hip or chair, then gently lean to the left as if creating space between ribs.
- Hold for three slow breaths, keeping both sides of the waist long rather than collapsing.
- Switch sides and repeat, aiming for symmetry in effort rather than identical shape.
- Breathing cue: inhale into the open side ribs, then exhale and soften the shoulder.
- Form cue: keep the pelvis steady so the movement stays in the side body.
- Modify: bend the raised elbow slightly if the shoulder feels tight.
Step 6: Upper-back opener with a gentle hug stretch
Rounded posture often locks the upper back, so a simple self-hug can create width across the shoulder blades in a very controlled way.
- Wrap your arms around your torso as if giving yourself a loose hug, letting hands rest on opposite shoulders or upper arms.
- Exhale and gently draw the elbows forward, feeling the upper back broaden without forcing the neck.
- Hold for three to five breaths, then release slowly and let the arms hang heavy.
- Breathing cue: lengthen the exhale slightly if you notice bracing in the chest.
- Form cue: keep the chin softly tucked so the neck stays neutral.
- Modify: perform the hug stretch seated if standing feels tiring.
Step 7: Thoracic rotation for a more mobile spine
Rotation supports daily comfort because turning through the upper back reduces the urge to twist only from the neck or lower back.
- Stand or sit tall, then cross your arms over your chest lightly, keeping shoulders relaxed.
- Inhale to grow taller through the spine, then exhale as you rotate gently to the left.
- Pause for one breath, return to center smoothly, then rotate gently to the right.
- Repeat two to three times each side, keeping the movement slow and controlled.
- Breathing cue: rotate on the exhale, since exhaling often helps ribs soften.
- Form cue: keep hips facing forward so the twist stays in the torso.
- Modify: reduce range if you feel lower-back pinching.
Step 8: Cat–cow spine wave on hands and knees or at a countertop
Cat–cow is a beginner favorite because it warms the spine gently while encouraging breath-led movement.
- Choose hands-and-knees on the floor, or place hands on a countertop or the back of a sturdy chair.
- Inhale and arch the back slightly, letting the chest open without throwing the head back.
- Exhale and round the back gently, letting the shoulder blades spread while the belly softens inward.
- Continue for five slow cycles, moving like a wave rather than snapping between positions.
- Breathing cue: match inhale to the gentle arch and exhale to the gentle round.
- Form cue: keep wrists comfortable by widening hands or using fists if needed.
- Modify: reduce the arch if the lower back feels compressed.
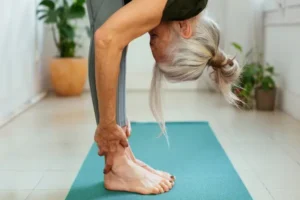
Step 9: Supported forward hinge for hamstrings and back line
Hamstrings often feel tight, and a supported hinge helps you target them without yanking on your lower back.
- Stand with feet hip-width apart and keep a soft bend in both knees.
- Place hands on thighs or on a chair in front of you, then hinge at the hips while keeping the spine long.
- Stop when you feel a mild stretch behind the legs, then hold for three to five breaths.
- Return to standing slowly, stacking the spine gently instead of jerking upright.
- Breathing cue: exhale into the hinge, then inhale to maintain length.
- Form cue: keep weight balanced through the feet rather than drifting into the toes.
- Modify: hinge less if you feel pulling behind the knee.
Step 10: Hip flexor opener with a short stance or half-kneel
Front-of-hip tightness is common, and opening it can make standing and walking feel smoother after long periods of sitting.
- Stand in a short split stance while holding a chair for balance, or choose a half-kneeling position on a cushion.
- Gently tuck the pelvis as if bringing the tailbone slightly forward, keeping ribs stacked over hips.
- Shift forward just a few centimeters until a mild stretch appears at the front of the back hip.
- Hold for three to five breaths, then switch sides with the same calm pacing.
- Breathing cue: exhale as you shift forward, then inhale while staying tall.
- Form cue: avoid big back arches, because arching often creates pressure instead of openness.
- Modify: shorten the stance if balance is challenging.
Step 11: Quad stretch with support for balance
Quads can feel tight from sitting and from activity, and a supported quad stretch is a practical way to address the front thigh without wobbling.
- Stand tall and hold a chair or wall with one hand, then bend your right knee and bring the heel toward the glute.
- Hold the ankle or pant leg gently, keeping knees close together without forcing them to touch.
- Soften the pelvis slightly under you, then hold for three to five breaths while keeping the chest lifted.
- Release slowly, switch sides, and repeat with the same gentle control.
- Breathing cue: exhale and soften the front hip, then inhale to stay upright.
- Form cue: keep the standing knee soft to reduce strain and improve balance.
- Modify: use a towel around the ankle if reaching is difficult.
Step 12: Figure-four glute stretch for outer hips
Glutes and outer hips often contribute to the feeling of a “tight back,” so this stretch can create relief that feels bigger than the movement looks.
- Sit on a chair or the edge of a couch, then cross the right ankle over the left knee.
- Flex the right foot gently, then inhale to lengthen the spine and exhale to hinge forward slightly.
- Hold for three to five breaths, noticing the stretch in the outer hip rather than in the knee.
- Switch sides and repeat, keeping the effort even and the breath calm.
- Breathing cue: exhale to soften into the hip, then inhale to keep the spine long.
- Form cue: avoid pressing the knee down, since pressure can irritate the joint.
- Modify: cross the ankle lower on the shin if the full shape is too intense.
Step 13: Inner thigh and groin opener with a wide stance
Inner thighs tighten quietly, and opening them gently can improve comfort in walking, squatting, and daily movement patterns.
- Stand in a wide stance with toes pointing forward or slightly outward, then place hands on a chair or countertop.
- Shift weight toward the left leg while bending the left knee slightly, keeping the right leg straighter.
- Hold for two to three breaths, then move slowly through center and shift to the other side.
- Repeat two rounds, keeping the movement smooth and avoiding bouncing.
- Breathing cue: exhale as you shift, then inhale as you return through center.
- Form cue: keep hips level rather than twisting the pelvis.
- Modify: widen less if the groin feels sensitive.
Step 14: Calf stretch and Achilles-friendly variation
Calves influence how your whole body stands, and releasing them can make the final part of your head to toe stretches feel grounded and complete.
- Face a wall and place both hands on it at chest height, then step the right foot back and keep the heel down.
- Bend the front knee gently until you feel a mild calf stretch in the back leg.
- Hold for three breaths, then bend the back knee slightly to shift the stretch lower toward the Achilles area.
- Switch sides and repeat both versions, moving slowly and keeping the heel heavy.
- Breathing cue: exhale and soften the calf, then inhale to maintain steady pressure.
- Form cue: keep the back foot pointing forward rather than flaring outward.
- Modify: shorten the step back if the heel lifts off the floor.
Step 15: Ankle circles and foot wake-up to finish head to toe
Ankles and feet deserve attention because they support every step you take, and finishing here can leave you feeling more stable and connected to the ground.
- Hold a chair for balance and lift one foot slightly off the floor, then circle the ankle slowly five times in one direction.
- Reverse the direction and circle five times, keeping the movement smooth rather than fast.
- Place the foot down and gently spread the toes, then press the big toe into the floor for one breath.
- Switch feet and repeat, then stand tall and take one final slow breath to notice how your body feels.
- Breathing cue: keep breaths natural here, using the exhale to relax the lower legs.
- Form cue: make circles controlled, because fast circles can create tension in the shin.
- Modify: perform ankle circles seated if balance is a concern.
Beginner flexibility plan: options to shorten or extend the routine
Short routines build habits, while longer routines deepen the experience, so choosing the right length for today is part of making this sustainable.
Shortening works best when you keep the head-to-toe order, because the predictable flow helps your brain remember what comes next.
Extending feels best when you add time to the tightest regions rather than rushing to add new stretches, because more variety is not always more effective.
7-minute “busy day” version
- Do the breathing reset for three breaths, then complete neck nods and shoulder rolls.
- Choose either the side body reach or the hug stretch, then do cat–cow for five cycles.
- Finish with the supported hinge, hip flexor opener, and calf stretch, using two to three breaths each.
- Best for: mornings when you want a whole-body reset without committing to a longer session.
- Keep in mind: gentle pace matters more than adding extra positions.
12–15 minute “standard” version for a complete body routine
- Follow the entire head-to-toe sequence once, holding most stretches for three to five breaths.
- Repeat your tightest two stretches for an extra round, using slightly slower exhales.
- Add one extra minute of cat–cow or thoracic rotation if your upper back feels stiff.
- Best for: a steady, repeatable full body stretching routine at home that fits most schedules.
- Keep in mind: comfort stays the priority even when you have more time.
20-minute “slow and soothing” extended version
- Complete the full sequence with five slow breaths per stretch, keeping transitions unhurried.
- Hold the hip flexor opener, figure-four, and calf stretch for an extra thirty seconds each if they feel helpful.
- Finish with two minutes of quiet breathing, standing tall and noticing the full-body effect.
- Best for: recovery days, stress-heavy days, and evenings when you want a calmer nervous system.
- Keep in mind: longer time should feel gentler, not more intense.
Frequency ideas: how often to repeat this full body stretching routine at home
Frequency depends on your schedule and your body, yet many beginners feel the biggest benefit when stretching becomes a regular rhythm rather than a rare event.
Daily gentle work can feel great when intensity stays moderate, because the body often responds well to repeated signals of safety and movement.
Three to four sessions per week also works well, especially if you prefer longer sessions and want rest days between them.
Short daily sessions plus one longer weekly session can be a balanced approach, because the daily work maintains comfort while the weekly session explores more time and softness.
Simple schedules you can choose from
- Daily light plan: 7 minutes every day, using the busy-day version and keeping effort around 3–4 out of 10.
- Balanced plan: 12–15 minutes on Monday, Wednesday, and Saturday, using the standard version and staying calm with breath.
- Consistency plan: 7 minutes on weekdays plus a 20-minute slow session on Sunday, which creates a reset day without pressure.
How to tell if you are doing too much
- Lingering soreness that lasts more than a day can mean the holds were too intense or too long for your current level.
- Sharp joint discomfort suggests you need smaller range or a different variation that suits your structure.
- Breath-holding during stretches is a clear sign to reduce intensity, because relaxed breathing is part of safe stretching.
Common mistakes beginners make, and the gentle fixes that help
Most stretching setbacks come from moving too fast or pushing too hard, because the nervous system responds to threat by tightening rather than releasing.
Better results usually come from patient repetition and careful attention to comfort signals, especially in a beginner flexibility plan meant to be repeatable.
Mistakes and easy corrections
- Forcing range: ease off slightly until you can breathe smoothly, then let time and repetition do the work.
- Bouncing: replace bouncing with slow pulses that stay small, or choose a steady hold and soften the exhale.
- Collapsing posture: grow tall first, then move into the stretch, because length often creates space without strain.
- Ignoring asymmetry: give the tighter side one extra breath, while keeping the effort gentle and even.
- Skipping transitions: come out slowly, because abrupt exits can trigger guarding and make the body feel less safe.
Helpful cues that keep the routine methodical
- Lengthen first, then soften, because “space before depth” often feels better than pushing deeper immediately.
- Exhale into the stretch, because the exhale naturally reduces bracing in many people.
- Choose stability, because supported positions usually allow muscles to relax more fully.
- Stop at comfort, because comfort creates consistency and consistency creates results.
FAQ about head to toe stretches at home
Should stretching be done in the morning or evening?
Morning sessions can help you feel less stiff and more awake, while evening sessions can feel calming after a long day, so the best choice is the one you will repeat.
Is it normal to feel tighter on one side?
Asymmetry is very common, so treat the tighter side with patience, add one extra breath, and avoid forcing it to match quickly.
Can beginners stretch every day?
Daily stretching can be appropriate when intensity stays gentle, holds stay reasonable, and your body feels better afterward rather than irritated.
What if I cannot get on the floor comfortably?
Chair-supported versions of cat–cow, hinges, hip stretches, and ankle work can still create a complete body routine without needing floor positions.
How will I know the routine is working?
Improvement often looks like easier movement during daily tasks, calmer breathing in stretches that used to feel intense, and less stiffness when you stand up after sitting.
Notice about independence and third parties
Notice: this content is independent and does not have affiliation, sponsorship, or control by any institutions, platforms, or third parties mentioned or implied.
Printable recap: the full body stretching routine at home in head-to-toe order
- Reset: calm breathing and posture stacking for three to five breaths.
- Neck: nods, slow turns, and optional small side tilts with relaxed shoulders.
- Shoulders: rolls and gentle shoulder blade glides without aggressive squeezing.
- Wrists: forearm stretches with light pressure and no tingling.
- Side body: overhead reach and gentle lean with ribs expanding.
- Upper back: self-hug opener to widen the shoulder blades.
- Thoracic: slow rotations with hips stable and ribs leading.
- Spine: cat–cow waves with breath-led motion.
- Hamstrings: supported hinge with soft knees and long spine.
- Hips: hip flexor opener plus figure-four glute stretch.
- Inner thighs: side shift in a wide stance with control.
- Calves: straight-knee and bent-knee wall stretches.
- Ankles and feet: slow circles, toe spread, and one final grounding breath.
Closing guidance for a gentle, repeatable complete body routine
Consistency is the quiet secret of flexibility, because the body responds best to regular, kind signals rather than occasional intense efforts.
Choose the version that fits today, keep your breathing calm, and let this full-body routine become a steady home practice you can return to without stress.