
Post workout stretching routine basics make the end of a light session feel organized, calmer, and noticeably easier on tight muscles.
A simple sequence done while you are still warm can reduce stiffness, support post exercise flexibility, and help your body downshift without drama.
Post workout stretching routine basics: what this routine is, and who it is for
This routine is built for beginners who finish a light workout and want a clear next step that does not require special equipment, advanced mobility, or a lot of floor space.
Movements stay gentle and practical, so the goal is to feel better when you stand up tomorrow rather than to chase deep flexibility milestones in one session.
Most of the sequence uses comfortable positions you can do at home, such as standing with support, sitting on a chair, or using the floor only when it feels safe and convenient.
Each stretch is paired with straightforward cues, because knowing what you should feel matters more than forcing your body into a “perfect-looking” shape.
Hold times are short enough to fit real life, yet long enough to tell your nervous system that it can relax, release, and settle after effort.
What you can expect after a week of consistent cool down stretches
- Less stiffness the next day, especially in hips, calves, and shoulders, because tissues adapt well to repeated gentle signals.
- A calmer “end of workout” feeling, because breathing and steady holds can shift you out of rush mode.
- More awareness of where you tighten first, which helps you choose smarter exercise form and smarter recovery habits.
- Improved post exercise flexibility over time, because consistent practice tends to matter more than intensity.
What you will not do in this beginner sequence
- No bouncing, because bouncing often triggers protective tightening and can irritate joints when you are fatigued.
- No forced end-range positions, because pushing through pain is not a reliable way to reduce stiffness safely.
- No complicated transitions, because simple steps keep the routine repeatable after any light workout.
Why stretch after a workout rather than before strength work
Stretching can be useful at different times, yet the type and timing matter, because your body needs different inputs when you are preparing to lift versus when you are recovering.
Before strength work, the main job is to feel ready to move well and produce force, which is why a brief warm-up with dynamic motion and gentle activation is often the better fit.
Long, static holds right before heavy effort can leave some people feeling less “snappy,” so many beginners prefer saving longer holds for after training when performance is no longer the priority.
After a workout, body temperature is higher and tissues are already moving, which often makes cool down stretches feel smoother and more comfortable.
Post-workout stretching also supports a clear mental transition, because it signals that the hard part is finished and the next phase is recovery.
A practical warm-up versus cool-down distinction
- Warm-up focus: increase circulation, practice movement patterns, and gently prepare joints and muscles for load.
- Cool-down focus: slow the pace, restore comfortable range, and reduce stiffness with calm breathing and easy holds.
- Best beginner approach: use dynamic motion before, then use this post workout stretching routine basics sequence after.
Quick signs your pre-workout stretching is too “static” for strength days
- Heaviness or sluggishness shows up in the first few sets, even when the warm-up felt long.
- Joint positions feel less stable under load, especially in shoulders and hips.
- Breathing becomes shallow and braced before the workout has even started.
Post workout stretching routine basics: intensity rules that keep it safe
Gentle intensity is the fastest route to consistency, because comfort makes it easier to repeat the routine after every session without dreading the experience.
A mild-to-moderate pull is the target, while sharp pain, pinching, tingling, or numbness are signals to stop and choose a smaller range or a different position.
Breathing is your built-in safety meter, since an easy exhale usually means you are in a range your nervous system will allow.
Slow transitions matter, because rushing out of a stretch can feel like a sudden threat to the body, which can lead to tightening instead of release.
The easy effort scale for beginners
- 2–3 out of 10: very light, soothing, and perfect on days when you feel tired or tight.
- 4–5 out of 10: clear stretch sensation while breathing stays calm, which is the sweet spot for most people most days.
- 6 out of 10: occasionally okay, yet only if your face stays relaxed and you could stay longer without wanting to escape.
Breathing cues that make post exercise flexibility feel easier
- Inhale gently and imagine space around the ribs, because rib expansion reduces neck and shoulder bracing.
- Exhale slowly and let the jaw soften, because jaw tension often recruits neck tension without you noticing.
- Move deeper only on the exhale, because the exhale usually allows tissues to relax more naturally.
- Pause and reset if breath becomes choppy, because choppy breath is often a sign of pushing too far.
How long should you hold each stretch after light workouts
Hold time does not need to be long to reduce stiffness, because short, repeated exposure is often enough when the body is warm and receptive.
Most beginners do well with twenty to forty seconds per stretch, or about three to five slow breaths if you prefer breath counting.
Two rounds of shorter holds can feel better than one round of long holds, because the second pass often feels smoother without forcing range.
Two timing options that keep this complete body routine flexible
- Fast finish: 20 seconds each, one round, total time about 5 minutes.
- Standard cool-down: 30–40 seconds each, one round, total time about 8–10 minutes.
- Extra recovery: 30 seconds each, two rounds, total time about 12–15 minutes.
When longer holds make sense
- Stress feels high, because longer exhales paired with longer holds can help downshift your nervous system.
- Training volume was higher than usual, because a slower cool down can feel soothing without adding more fatigue.
- Stiffness is persistent, because gentle consistency plus a little extra time often beats aggressive stretching.
Post workout stretching routine basics sequence: the 8-move cool down
This sequence is ordered to move from breathing and posture into legs and hips, then back to the upper body, because that pattern feels balanced after most light workouts.
A chair, a wall, or a countertop can be used for support, because stability helps muscles relax rather than brace.
Choose one hold length and stick with it, because consistency makes the routine easy to remember and easy to repeat.
Move 1: Downshift breathing and posture reset
Stand tall with feet hip-width apart, letting knees stay soft so the legs feel grounded rather than locked.
Place one hand on your belly and one hand on your lower ribs, then allow the shoulders to drop away from the ears.
Inhale slowly through the nose if comfortable, then exhale longer than you inhaled, because the longer exhale signals “safe” to your system.
Stay for three to five breaths, noticing where your body feels worked without judging the sensation.
- Feel for: a calmer heartbeat and less shoulder tension as the exhale lengthens.
- Avoid: lifting shoulders toward ears while inhaling, because that adds neck strain.
- Modify: sit on a chair if standing feels unsteady after training.
Move 2: Calf stretch with wall support
Face a wall and place both hands on it at chest height, because stable support helps you relax through the lower legs.
Step the right foot back and keep the heel down, then bend the front knee gently until a mild stretch appears in the back calf.
Hold the position while breathing steadily, then bend the back knee slightly to shift the sensation toward the Achilles area.
Switch sides and repeat the same two versions, keeping the heel heavy and the toes pointing forward.
- Straight-knee version: 20–40 seconds per side for the main calf.
- Bent-knee version: 20–30 seconds per side for the lower calf and Achilles area.
- Feel for: a steady pull in the calf, not a sharp pinch near the ankle.
- Avoid: turning the back foot outward, because it can shift stress into the ankle.
- Modify: shorten the step if the heel lifts, because a lifted heel usually means the stance is too long.
Move 3: Standing quad stretch with balance assist
Stand tall beside a wall or chair, because balance support keeps the stretch in the thigh instead of in a wobbling ankle.
Bend the right knee and bring the heel toward the glute, then hold the ankle or pant leg gently without yanking.
Tuck the pelvis slightly under you, which often increases the front-thigh stretch without arching the lower back.
Hold, breathe, and switch sides with the same calm pace.
- Set posture first: chest lifted, ribs stacked, shoulders relaxed.
- Find the stretch second: gentle heel-to-glute movement and small pelvic tuck.
- Soften while holding: slow exhale, relaxed jaw, steady balance support.
- Feel for: front-thigh lengthening with a stable knee position.
- Avoid: pulling the heel hard, because aggressive pulling can irritate the knee.
- Modify: use a towel around the ankle if reaching is difficult.
Move 4: Hamstring hinge using a chair
Stand facing a chair and place your hands on the chair back, because support helps you hinge without rounding aggressively.
Walk the feet back slightly, keep knees softly bent, and hinge at the hips while keeping the spine long.
Stop when you feel a mild stretch behind the thighs, then breathe slowly and allow the hips to drift back rather than forcing the chest down.
Return to standing slowly, because slow exits reduce the chance of a lightheaded rush after training.
- Hold for 20–40 seconds while maintaining soft knees.
- Reset posture for one breath at the top.
- Repeat once if it feels good, because the second pass is often smoother.
- Feel for: stretch in hamstrings, not sharp pulling behind the knee.
- Avoid: locking knees, because locked knees often turn the stretch into strain.
- Modify: hinge less if your lower back feels tight, because the goal is comfort and control.
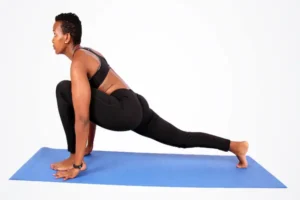
Move 5: Hip flexor stretch in a short split stance
Step into a short split stance and hold a wall or chair lightly, because stability keeps the pelvis from wobbling.
Gently tuck the pelvis as if zipping up snug jeans, then shift forward a few centimeters until the front of the back hip feels a mild stretch.
Keep ribs stacked over hips, because a big lower-back arch usually reduces the hip flexor stretch and increases back pressure.
Hold, breathe, and switch sides, keeping the stance short rather than deep.
- Find a short stance where you feel stable.
- Tuck pelvis lightly and keep glute softly engaged.
- Shift forward slightly and hold for 20–40 seconds.
- Feel for: stretch at the front of the hip, not a pinch in the lower back.
- Avoid: lunging too far, because depth can create instability when you are fatigued.
- Modify: reduce the forward shift if your front knee moves far past the toes.
Move 6: Glute stretch with seated figure-four
Sit on a chair or bench and cross the right ankle over the left knee, then flex the right foot gently to support the knee.
Lengthen the spine on the inhale, then hinge forward slightly on the exhale until the outer right hip feels a mild stretch.
Hold while keeping shoulders relaxed, because shoulder tension often sneaks in when hips feel tight.
Switch sides and repeat with the same gentle effort.
- Hold 20–40 seconds per side while breathing slowly.
- Uncross slowly, because a quick release can feel jarring to the hip.
- Repeat the tighter side for one extra breath if stiffness is obvious.
- Feel for: sensation in the glute and outer hip rather than in the knee joint.
- Avoid: pressing the knee downward, because pressure can irritate the joint.
- Modify: place the ankle lower on the shin if the full position feels too intense.
Move 7: Chest and front-shoulder opener without forcing range
Stand tall and clasp your hands behind your back, or hold a towel behind your back if the clasp is uncomfortable.
Lift the hands slightly away from the body while keeping ribs from flaring up, because rib flare often turns the stretch into low-back compression.
Imagine collarbones widening, then breathe steadily and keep the neck long.
Release slowly and roll the shoulders gently to reset.
- Feel for: opening across the chest and front shoulders.
- Avoid: shrugging up, because that tightens the neck and reduces the benefit.
- Modify: keep hands lower and focus on posture if shoulders feel pinchy.
Move 8: Upper back and neck release with a self-hug
Wrap your arms around your torso as if giving yourself a light hug, letting hands rest on opposite shoulders or upper arms.
Exhale and gently reach the elbows forward, feeling the shoulder blades widen without rounding aggressively through the lower back.
Hold for 20–30 seconds while keeping the chin softly tucked and the jaw relaxed.
Unwrap slowly and finish with one comfortable neck turn each direction, staying within an easy range.
- Hold for two to three slow breaths.
- Release on an exhale.
- Reset posture for one final calm breath.
- Feel for: upper-back spreading and less tightness near the shoulder blades.
- Avoid: pulling the head into a stretch with your hands, because neck tissues can be sensitive after training.
- Modify: do the hug stretch seated if legs feel tired.
How to use this routine after different types of light workouts
Light workouts vary, so the best cool down stretches are the ones that match what you actually did rather than what looks impressive on a checklist.
Walking sessions often leave calves and hips tight, while beginner strength sessions often leave chest, shoulders, and quads feeling worked.
Short cardio intervals can leave the front of the hips tight and breathing elevated, which is why the first downshift breathing step is always worth keeping.
After a brisk walk or easy run
- Prioritize calves, hamstrings, and hip flexors, because those areas usually absorb the repetitive stride pattern.
- Keep holds closer to 20–30 seconds, because tissues may still feel reactive after impact.
- Add a second calf stretch round if ankles feel stiff, because ankle comfort often improves quickly with repetition.
After a beginner strength session
- Prioritize quads, hip flexors, chest opening, and upper back spreading, because those areas often tighten during pressing and squatting patterns.
- Use the chair hinge gently, because hamstrings can feel “grabby” after deadlift-style movements.
- Keep intensity moderate, because strength fatigue can reduce balance and make deep ranges feel unstable.
After a short home circuit or bodyweight routine
- Follow the full 8-move sequence once, because circuits usually touch many areas without fully exhausting any single group.
- Repeat the tightest two stretches for an extra breath, because circuits can create uneven tension patterns.
- Extend the breathing reset by one minute if heart rate feels high, because calming the system supports recovery.
Reduce stiffness: simple reasons this cool-down helps beginners
Stiffness is not always a sign of “short muscles,” because it is often a mix of fatigue, nervous system protection, hydration, sleep quality, and how your body handled the session.
Cool down stretches help by reintroducing comfortable range, lowering overall tension, and giving your brain a sense of closure after effort.
Gentle holds with calm breathing can also improve how you notice your body, because awareness makes it easier to adjust training choices before discomfort grows.
Three beginner-friendly mechanisms worth knowing
- Warm tissues usually allow easier movement, so stretching after exercise often feels more comfortable than stretching cold.
- Steady breathing reduces bracing, which can reduce stiffness sensations even when the stretch range stays modest.
- Controlled positions teach your nervous system that movement is safe, which can lower protective tightness over time.
Post workout stretching routine basics: how often to do it
Consistency is the lever that makes post exercise flexibility improve, because an easy routine repeated often usually beats an intense routine repeated rarely.
Most beginners do well stretching after every light workout, especially when holds are moderate and the sequence stays comfortable.
On rest days, a shorter version can still help reduce stiffness, because gentle movement keeps the body from settling into one rigid pattern.
Simple frequency plans you can actually follow
- After every workout plan: complete the full 8-move sequence once after each session, keeping holds at 20–30 seconds.
- Three-day plan: do the routine after workouts, then choose three favorite stretches on other days for a 2-minute reset.
- Busy-week plan: do moves 1, 2, 5, and 7 after training, because those cover breathing, calves, hips, and chest efficiently.
How to decide if you should repeat a stretch for a second round
- Repeat if the first hold felt stiff and the second hold feels smoother without extra effort.
- Skip repeating if balance feels shaky, because instability often increases bracing and reduces benefit.
- Hold shorter if soreness is high, because gentle range is often the best choice on sensitive days.
Options to shorten or extend your post-workout sequence
Time changes day to day, so flexible structure keeps the habit alive even when motivation is low and schedules are packed.
Short versions work best when they still include breathing plus one lower-body and one upper-body stretch, because that combination feels complete.
Long versions work best when time is added to holds rather than adding lots of new movements, because simplicity protects consistency.
5-minute version for the quickest finish
- Downshift breathing and posture reset for five breaths.
- Calf stretch both sides for 20 seconds each.
- Hip flexor stretch both sides for 20 seconds each.
- Chest opener for 20–30 seconds.
- Self-hug upper back release for 20–30 seconds.
8–10 minute standard version for most beginners
- Complete all 8 moves once, holding 30 seconds per stretch and keeping transitions slow.
- Repeat the tightest one stretch for one extra breath per side.
- Finish with one final calm breath while standing tall.
12–15 minute extended version for extra recovery
- Complete all 8 moves once at 30–40 seconds per stretch.
- Repeat calves, hip flexors, and figure-four for a second round if those areas are your usual stiffness hotspots.
- Add an extra minute of downshift breathing if your nervous system feels wired after training.
Common mistakes beginners make, and straightforward fixes
Beginners often think stretching should hurt to work, yet pain usually triggers guarding, which is the opposite of what you want for recovery.
Another common issue is moving too fast through holds, because rushing can keep your nervous system alert rather than relaxed.
Holding breath is a frequent hidden mistake, because breath-holding makes the body brace and can make post-workout tightness feel worse.
Mistakes to avoid during cool down stretches
- Forcing a stretch deeper each exhale, because intensity creep can turn a good cool-down into soreness.
- Locking knees in hamstring work, because locked knees often create strain behind the knee.
- Overarching the lower back in hip flexor stretches, because that shifts pressure into the spine instead of opening the hip.
- Shrugging in chest openers, because shoulder elevation adds neck tension and reduces the chest stretch.
- Dropping into positions without control, because control is a reliable sign of safe range.
Fixes that keep the routine practical
- Back off to a range where breathing is easy, then stay there and let the nervous system soften gradually.
- Add support with a wall or chair, because stability reduces bracing and improves the stretch quality.
- Shorten holds to 15–20 seconds when fatigue is high, because a shorter hold done well beats a longer hold done tensely.
- Repeat the routine consistently rather than stretching harder, because repetition is the most reliable path to reduce stiffness over time.
FAQ: post workout stretching routine basics for beginners
Should stretching be the only cool-down after a workout?
A short walk or easy movement for one or two minutes can be a great start, because gradual slowing often makes stretching feel more comfortable and less abrupt.
Is soreness the next day a sign the stretching worked?
Light muscle tenderness can happen from the workout itself, while sharp soreness after stretching usually means intensity was too high, so reducing range is the smart move.
Can this routine improve post exercise flexibility long term?
Progress is very realistic when the routine is repeated consistently with gentle effort, because flexible tissues respond best to regular, safe signals.
What if time is limited after training?
A shorter version that includes breathing plus calves, hip flexors, and a chest opener can still be effective, because it targets common tight areas efficiently.
What if one side feels much tighter than the other?
Asymmetry is common, so adding one extra breath on the tighter side while keeping the sensation mild is usually enough without forcing it to match immediately.
Notice about independence and third parties
Notice: this content is independent and does not have affiliation, sponsorship, or control by any institutions, platforms, or third parties mentioned or implied.
Printable recap: the basic cool-down sequence
- Downshift breathing and posture reset for three to five breaths.
- Calf stretch with straight-knee and bent-knee options on both sides.
- Standing quad stretch with balance support and gentle pelvic tuck.
- Chair-supported hamstring hinge with soft knees and long spine.
- Short-stance hip flexor stretch with ribs stacked and small forward shift.
- Seated figure-four glute stretch with flexed foot and calm hinge.
- Chest opener using hands or a towel behind the back without rib flare.
- Self-hug upper back release plus gentle neck turns to finish.
Closing: make recovery simple, repeatable, and gentle
Post workout stretching routine basics work best when they are easy enough to repeat after every light session, because repetition is what steadily reduces stiffness and builds comfort.
Next time training ends, choose the version that fits your day, breathe slowly, stay within a comfortable range, and let the cool-down become a dependable habit rather than an occasional add-on.