
Long hours in a chair can leave your hips feeling like they have forgotten how to move freely, especially when you stand up and everything feels stiff, compressed, or oddly “stuck.”
This gentle guide offers a beginner-friendly stretching routine for tight hips, complete with chair and pillow support options, slow hold times, and clear comfort cues.
Stretching routine for tight hips: why sitting can make your hips feel stubborn
Sitting keeps the hips in a bent position for a long time, and that repeated shape can teach the front of the hips to feel shortened while the glutes feel sleepy and underused.
Desk work and long drives also reduce the variety of movements your hips experience, so the joint may feel less smooth simply because it is doing less “daily exploration.”
Tight hips are not always about “short muscles,” because the nervous system can create protective tension when a position feels unfamiliar or when stress is high.
Many people notice the stiffness most when standing after sitting, climbing stairs, stepping out of a car, or turning quickly, because the hips are suddenly asked to extend and rotate.
Gentle, repeated hip-focused stretching tends to work best when it feels safe and gradual, since safety signals help the body release guarding and allow range of motion to return.
What tight hips can feel like after long sitting
Stiffness often shows up as a pinchy sensation in the front crease of the hip, a dull ache in the outer hip, or a heavy, tired feeling in the glutes.
Some bodies express hip tightness as a tight lower back, because limited hip motion can encourage the spine to “borrow” movement it was never meant to repeat endlessly.
Other people feel tight hips as knee irritation, since the thigh can rotate awkwardly when the hips are not moving smoothly.
Awareness matters here, because naming what you feel helps you choose the gentlest version of each stretch rather than forcing your way into discomfort.
A quick, body-aware self-check before you stretch
Before you begin, notice how you stand and whether you feel more weight in one leg, because weight-shifting habits can quietly influence hip comfort.
Next, take a slow step forward and see if one side feels shorter or stiffer, because asymmetry is common and does not automatically mean something is “wrong.”
Then, place your hands on your lower ribs and try a calm breath, because shallow breathing can increase bracing around the hips and belly.
Finally, choose a comfort goal for today, such as “softer movement” or “less pinching,” because flexible expectations keep the routine supportive rather than demanding.
Set up your space for hip opening stretches without strain
A calm setup makes your stretches easier to tolerate, and tolerance is what helps your body relax instead of tightening up defensively.
Floor work can feel wonderful for hips, yet a chair option is equally valid, especially if you are stiff, tired, or simply want more control.
Support tools are not shortcuts, because pillows and chairs often create better alignment and reduce the urge to push beyond what feels safe.
Comfort props that make tight-hip work feel friendlier
- A firm pillow or folded blanket can support your knees in reclined positions, which often reduces hip crease pinching.
- A sturdy chair can provide balance support and create a reliable seated hip routine when the floor feels like too much effort.
- A yoga strap, scarf, or belt can help you hold your leg without pulling with your hands and shoulders.
- A cushion under the knees can make kneeling positions more comfortable if you choose to include them.
- A small towel can support the head and neck so the upper body relaxes, which often helps the hips release indirectly.
Three safety rules that keep beginner hip mobility gentle
- Move slowly into every position, because speed can trigger guarding even if the stretch itself is mild.
- Stay at a sensation level you could breathe through comfortably, because breath-holding usually means the body feels threatened.
- Stop or modify if discomfort increases, because “more intense” is not the same as “more effective,” especially for sensitive hip joints.
Breathing cues that help hips soften instead of fight
Longer exhales can encourage the pelvis and glutes to relax, which is helpful when your hips feel clenched from sitting.
Gentle nasal inhales work well for many people, yet an occasional soft sigh out of the mouth can release hidden tension around the ribs and belly.
Quiet breathing is the goal, because loud or forced breathing can signal effort and keep the hips braced.
Stretching routine for tight hips: a beginner sequence for after sitting
This stretching routine for tight hips is designed to take about 12 to 18 minutes, depending on how long you choose to hold each shape.
Options are included so you can stay on the floor if that feels best, or use a chair when you want more support and less strain.
One slow pass through the routine is enough on many days, while a second pass can feel wonderful when you have been sitting for hours and your hips feel especially sticky.
Consistency matters more than intensity, so think of this as gentle maintenance for your hips rather than a one-time “fix.”
How to use the routine without overthinking it
- Choose either the floor-friendly path or the chair-friendly path, because switching mid-session can feel distracting when you are learning the shapes.
- Hold each stretch for the suggested time, yet shorten the hold if your breath becomes strained or your body feels irritated.
- Keep the sensation mild to moderate, because hips often open faster when they feel safe rather than forced.
- Finish with a calm minute of breathing, because your nervous system remembers the ending, and endings shape whether you want to repeat the routine tomorrow.
1) Pelvic clock on your back to reintroduce hip motion
Lie on your back with knees bent and feet flat, then imagine your pelvis is a clock face gently tilting toward 12 o’clock and 6 o’clock.
Continue by rocking toward 3 o’clock and 9 o’clock, keeping the movement small, smooth, and free of strain in the lower back.
Complete 6 to 10 slow circles in each direction, because circular motion lubricates the hips and gives your body a non-threatening start.
- Time: about 60 to 90 seconds.
- Breathing cue: exhale as the pelvis tilts, then inhale as it returns to neutral.
- Support option: place a pillow under your head if your neck feels tense while lying down.
2) Supported knee-to-chest, one side at a time
Keep one foot grounded and draw the other knee toward your chest, holding behind the thigh rather than pulling the kneecap.
Stay for 5 to 8 breaths, and let the grounded foot provide stability so the hip stretch feels controlled instead of wobbly.
Switch sides slowly, because quick transitions can wake up guarding muscles in the front of the hip.
- Hold time: 40 to 60 seconds per side.
- Breathing cue: inhale softly, then exhale and let the hip crease feel more spacious.
- Support option: keep both knees bent if the lower back feels sensitive.
3) Figure-four glute stretch, floor version for outer hips
Cross your right ankle over your left thigh, flex the right foot gently, and thread your hands behind the left thigh.
Draw the legs toward you only until you feel a steady stretch in the right glute and outer hip, rather than a pinch deep in the hip joint.
Hold for slow breaths, because the glutes often soften gradually as the nervous system realizes the position is safe.
- Hold time: 60 to 90 seconds per side.
- Breathing cue: exhale as if you are unclenching the back pocket area of the hip.
- Support option: place a pillow under the head or keep the uncrossed foot farther from the body to reduce intensity.
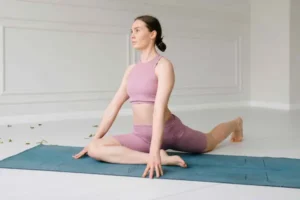
4) Figure-four glute stretch, chair version for a seated hip routine
Sit tall on a sturdy chair and cross one ankle over the opposite thigh, keeping the foot gently flexed to protect the knee.
Lean forward from the hips like a small bow, stopping as soon as you feel a clear stretch in the outer hip without knee pressure.
Rest your hands on the chair or your thighs, because arm support can reduce the urge to push aggressively.
- Hold time: 45 to 75 seconds per side.
- Breathing cue: inhale into the belly, then exhale and allow the hip muscles to soften.
- Support option: move the ankle lower on the shin if crossing at the thigh feels too intense.
5) Butterfly stretch with support for inner thighs and hips
Sit on the floor or on a folded blanket, bring the soles of your feet together, and let your knees open like a book without forcing them downward.
Bring a pillow under each knee if the inner thighs feel strained, because support can turn a stressful stretch into a soothing one.
Stay upright if the lower back feels tight, and hinge forward only a little if it feels comfortable and calm.
- Hold time: 60 to 120 seconds.
- Breathing cue: exhale and imagine the inner thighs becoming heavier and less guarded.
- Support option: sit on a higher cushion if the hips feel stuck and the back rounds immediately.
6) Half-kneeling hip flexor stretch with a chair option
Kneel on one knee with the other foot in front, and keep your torso tall while gently tucking the pelvis so the stretch targets the front of the hip rather than the lower back.
Hold a chair or wall for balance if needed, because stability helps you relax and prevents wobbling that can tighten the hip flexors.
Stay for several breaths, then switch sides with slow control, since transitions are often where people accidentally strain.
- Hold time: 30 to 60 seconds per side.
- Breathing cue: exhale and soften the front of the hip, as if you are letting the thigh “drop” forward.
- Support option: place a thick cushion under the kneeling knee, or do a standing hip flexor stretch with hands on a chair.
7) Standing hip flexor stretch for drivers and desk workers
Step one foot back into a short, stable stance while holding a chair, then bend the front knee slightly and keep the back heel grounded if that feels better.
Focus on a gentle opening in the front of the back hip, and avoid pushing your pelvis forward aggressively, because aggressive pushing often creates back compression.
Switch sides after slow breaths, keeping the stance small enough that you feel steady.
- Hold time: 25 to 45 seconds per side.
- Breathing cue: inhale to feel tall, then exhale and soften the front hip crease.
- Support option: keep both hands on the chair and shorten the stance further for more stability.
8) 90/90 hip switch for beginner hip mobility and rotation
Sit on the floor with one leg in front and the other leg to the side, both bent about ninety degrees, then keep your hands behind you for support.
Lean your torso slightly forward over the front shin to feel the outer hip, then return to center and switch sides slowly like a windshield wiper.
Move in a small range at first, because hip rotation can feel unfamiliar and your body may need gentle repetition before it relaxes.
- Repetitions: 4 to 8 slow switches.
- Breathing cue: exhale during the switch to reduce bracing.
- Support option: sit on a folded blanket to reduce strain and keep the pelvis more level.
9) Reclined hip opener with knees resting wide
Lie on your back and bring the soles of your feet together like a reclined butterfly, then let the knees fall outward only as far as comfort allows.
Add pillows under the outer thighs if the stretch feels too strong, because supported positions often create deeper relaxation than unsupported ones.
Stay for a full minute or two, letting the hip muscles release gradually rather than trying to force them open.
- Hold time: 60 to 150 seconds.
- Breathing cue: exhale and feel the pelvis settle heavier into the floor.
- Support option: keep feet farther from the pelvis if you feel pinching in the groin.
10) Supine twist to soften the outer hip and lower back
With knees bent, let them fall to one side while your shoulders stay relaxed, and place a pillow between the knees for comfort and stability.
Hold gently, because twisting should feel like wringing out tension rather than pushing into a deep spinal rotation.
Switch sides after slow breaths, keeping the motion smooth so your hips stay calm.
- Hold time: 45 to 90 seconds per side.
- Breathing cue: inhale into the back ribs, then exhale and soften the belly.
- Support option: reduce the twist range by keeping the knees closer to center.
11) Glute bridge hold to “wake up” hips after sitting
Lie on your back with knees bent, press through your feet, and lift your hips to a height that feels steady, then hold without squeezing the glutes aggressively.
Think of the bridge as gentle activation rather than a strength test, because a small wake-up signal can help the hips feel more stable after stretching.
Lower slowly and repeat if it feels good, since control often matters more than height.
- Repetitions: 2 to 4 holds of 10 to 20 seconds.
- Breathing cue: exhale as you lift, then breathe softly while holding.
- Support option: place a pillow between the knees if the hips feel unstable.
12) One-minute calm finish to lock in comfort
Rest on your back with a pillow under your knees, or sit comfortably in a chair with feet flat and hands open.
Let your exhale become slightly longer than your inhale, because longer exhales often help the hip flexors relax.
End the routine as soon as you feel calmer than you did at the start, because the goal is comfort and ease, not exhaustion.
- Time: 60 seconds.
- Breathing cue: breathe quietly enough that the shoulders do not lift.
- Support option: cover your torso with a light blanket if you cool down quickly.
Seated hip routine: a 5-minute reset for desks, cars, and busy days
On days when you cannot get to the floor, a seated hip routine can reduce stiffness without changing clothes or searching for space.
Short breaks work best when they feel doable, because the nervous system responds well to frequent, low-intensity movement “snacks.”
Drivers and desk workers often feel immediate relief from small hip motions, especially when those motions are paired with relaxed breathing.
Five minutes, one chair, and a calmer set of hips
- Sit tall and take five slow breaths, letting the shoulders drop and the jaw unclench.
- Lift one knee gently toward the chest for 6 slow reps per side, keeping the movement small and controlled.
- Perform ankle circles for 20 seconds per foot, because ankles and hips often stiffen together after stillness.
- Do the chair figure-four stretch for 30 to 45 seconds per side, staying mild and steady.
- Finish with a gentle seated twist for four breaths per side, keeping the rotation easy and pain-free.
Extra chair-based options when hips feel especially sticky
- Place a small pillow behind the lower back, because a supported spine often reduces hip gripping.
- Slide one foot forward and hinge slightly for a hamstring stretch, because hamstrings can tug on the pelvis and influence hip comfort.
- Stand up once and sit down once slowly, because controlled transitions teach the hips to move again without sudden strain.
Support options: how to choose pillows, chairs, and small ranges wisely
Pillows and chairs are not only for comfort, because they also help you find the stretch in the muscle rather than in the joint.
Range of motion should be earned through calm repetition, so choosing smaller ranges today can create bigger, safer progress over time.
Beginner hip mobility improves fastest when you finish each session feeling better, since feeling better is what makes you repeat the routine.
Where to place pillows for the most common hip complaints
- Place a pillow under the knees in reclined positions if the front hips feel pinchy or the lower back arches.
- Slide a pillow under each outer thigh in reclined butterfly if the inner thighs feel strained or shaky.
- Support the head and neck with a folded towel if the upper body feels tense, because neck tension can make the whole body brace.
- Use a cushion under the kneeling knee in hip flexor stretches if knee discomfort distracts you from relaxing the hips.
How to choose the right chair for hip stretching
- Select a chair that does not roll, because wheels can turn a calm stretch into a balance challenge.
- Prefer a seat height that lets your feet rest flat, because dangling feet can increase hip tension.
- Keep the chair on a non-slip surface, because feeling secure helps your body release into hip opening stretches.
Move slowly: comfort monitoring tips that keep hips safe
Hip tightness often includes a protective component, so moving slowly is not just a preference, but a strategy for teaching your body that the movement is safe.
Comfort monitoring is simple when you use a few clear signals, because signals reduce guesswork and reduce the temptation to push.
Progress tends to arrive when you listen well, because hips that feel heard often stop shouting through stiffness.
A simple “traffic light” system for hip sensations
- Green light: mild to moderate stretch sensation in muscle, steady breathing, and no sharpness.
- Yellow light: strong sensation that makes you tense or hold your breath, which suggests you should reduce range or add support.
- Red light: sharp pain, numbness, tingling, pinching deep in the joint, or increasing discomfort, which suggests you should stop and reassess.
How to tell the difference between a stretch and a pinch
A stretch usually feels broad and gradually softens with breathing, while a pinch often feels sharp, localized, and unchanged even when you back off slightly.
Joint pinching often shows up in the front hip crease during deep flexion, so reducing knee-to-chest intensity or adding a pillow can help immediately.
Muscle tightness often responds to longer exhales, so extending the exhale by a second or two can change the experience quickly.
Common mistakes that keep hips tight, even with a good routine
Good stretches can feel unhelpful if they are rushed, forced, or repeated with the same compensation patterns that created stiffness in the first place.
Small technique tweaks often make a huge difference, because hips respond more to alignment and breath than to intensity.
What to avoid if you want hips to relax
- Rushing into a deep position, because the nervous system interprets sudden depth as a threat and tightens muscles defensively.
- Pushing through pinching, because pinching is usually a joint signal, not a muscle stretch signal.
- Holding your breath, because breath-holding often increases abdominal bracing and hip flexor tension.
- Over-arching the lower back in hip flexor stretches, because the back can steal the stretch and leave the hip unchanged.
- Ignoring asymmetry, because one side often needs a gentler approach, and forcing both sides to match can create irritation.
Technique upgrades that make hip opening stretches feel better fast
- Use a smaller range and slower pace first, then let range increase only if the breath stays easy.
- Focus on pelvis position, because a slightly tucked pelvis can target the hip flexor more effectively than a dramatic lunge.
- Relax the jaw and hands, because tension in the face and fists often mirrors tension in the hips.
- Finish with a calm rest, because the routine works best when your body leaves the session feeling safe.
A realistic routine schedule for desk workers and drivers
Hip tightness from sitting tends to improve when you combine one longer session a few times per week with tiny movement breaks during the day.
Scheduling does not need to be strict, because flexibility grows from repetition, not perfection.
Short reminders can help, because long sitting often becomes invisible until the hips complain.
A simple weekly plan that fits real life
- Choose three days per week for the full stretching routine for tight hips, keeping the session gentle and consistent.
- Add the five-minute seated hip routine on two other days, especially after your longest sitting blocks.
- Take one or two lighter days where you only do pelvic clocks and calm breathing, because recovery supports progress.
Micro-break ideas that feel doable at work or on the road
- Stand up and shift weight side to side for 20 seconds, because lateral movement wakes up the outer hip muscles.
- Take a short walk to the kitchen or bathroom, because walking reintroduces hip extension after sitting.
- Perform a gentle standing hip flexor stretch using a desk or car door for support, keeping the stance stable and small.
- Sit tall and do two slow breaths with a longer exhale, because breath can reduce bracing even when you cannot stretch fully.
Tracking progress without pressure, so your hips stay patient
Tracking helps when it feels kind, because hips usually open slowly and the mind appreciates proof that effort is working.
Simple notes can reveal patterns, because you might notice that hips feel better on days you walk, sleep well, or take more breaks.
Comfort-based metrics matter most, because better movement quality often arrives before dramatic flexibility changes.
Three easy ways to measure improvement without chasing extremes
- Stiffness rating: record a quick 1-to-10 note when you stand after sitting, and watch for the average to drift downward over weeks.
- Movement ease: note whether stairs, car exits, or long walks feel smoother, because daily function is the most meaningful flexibility test.
- Breath quality: observe whether you can breathe calmly during hip stretches, because relaxed breathing often improves before range expands.
A tiny habit that keeps you consistent
- Pair one hip stretch with an existing cue, such as after brushing your teeth or after parking your car at home.
- Choose a minimum version that takes two minutes, because the easiest routine is the one you will do on tired days.
- Celebrate completion quietly, because positive reinforcement makes repetition feel natural rather than forced.
FAQ: stretching routine for tight hips and beginner hip mobility
How long should I hold hip stretches if I am a beginner?
Most beginners do well with 30 to 60 seconds per stretch, because that window is long enough to relax while still feeling safe and manageable.
Should I stretch hips every day if I sit all day?
Daily gentle movement often helps, yet intensity should remain mild, and taking lighter days can prevent irritation when tissues feel sensitive.
Why do my hips feel tight even though I stretch?
Stress, sleep, and long sitting can keep the nervous system guarded, so adding slower breathing, smaller ranges, and more frequent breaks often helps.
Is it normal to feel one hip tighter than the other?
Asymmetry is extremely common, so treat the tighter side with more patience and support rather than forcing it to match immediately.
What if I feel pinching in the front hip crease?
Pinching often improves when you reduce the depth of hip flexion, support the knees with pillows, and focus on pelvic alignment rather than pulling harder.
Can a seated hip routine really make a difference?
Chair-based stretches can be very effective, because frequency and comfort often matter more than intensity, especially for people who sit for work.
Important independence notice
Notice: this content is independent and does not have affiliation, sponsorship, or control by any institutions, platforms, or third parties mentioned.
Closing thoughts: let your hips feel safe, and they will usually soften
With slow pacing, supportive props, and a calm approach to sensation, hip opening stretches can become a gentle daily relief rather than another demanding task.
Over time, a consistent stretching routine for tight hips can help standing up feel smoother, walking feel freer, and long sitting feel less like it steals your mobility.